Moko – System Design
Shellycoat – Character Controller Design
Obscrete – Level Design
Overbloom – Innovation, Technical Implementation
Hypnagogia – System Design
Untitled Project – Level Design
Plastic – System Design
Stonesight
AutoRunner – Procedural Map Generation
Moko
Vikor Gjorgjeski, Oskar Lazar, Fea Schirrmacher, Leon Schurer @ DE:HIVE
2021 / 2D arcade platformer – downloadable on itch.io
Gameplay Trailer


Demonstrates:
System Design
Role:
System Designer,
Programmer, 2D Artist
Time:
10 weeks
System Design
Challenge
In Moko, the gameplay revolves around directional and force-based jumping, with the primary intuitive direction being upward. To maintain a fast-paced environment, it’s crucial that the world prompts quick actions from players. The objectives include achieving high scores, with points earned through specific actions. Equally important is the introduction of potential failure scenarios, adding an element of challenge. Additionally, the game design should incorporate pivotal decision points that engage players in meaningful ways.
Workflow
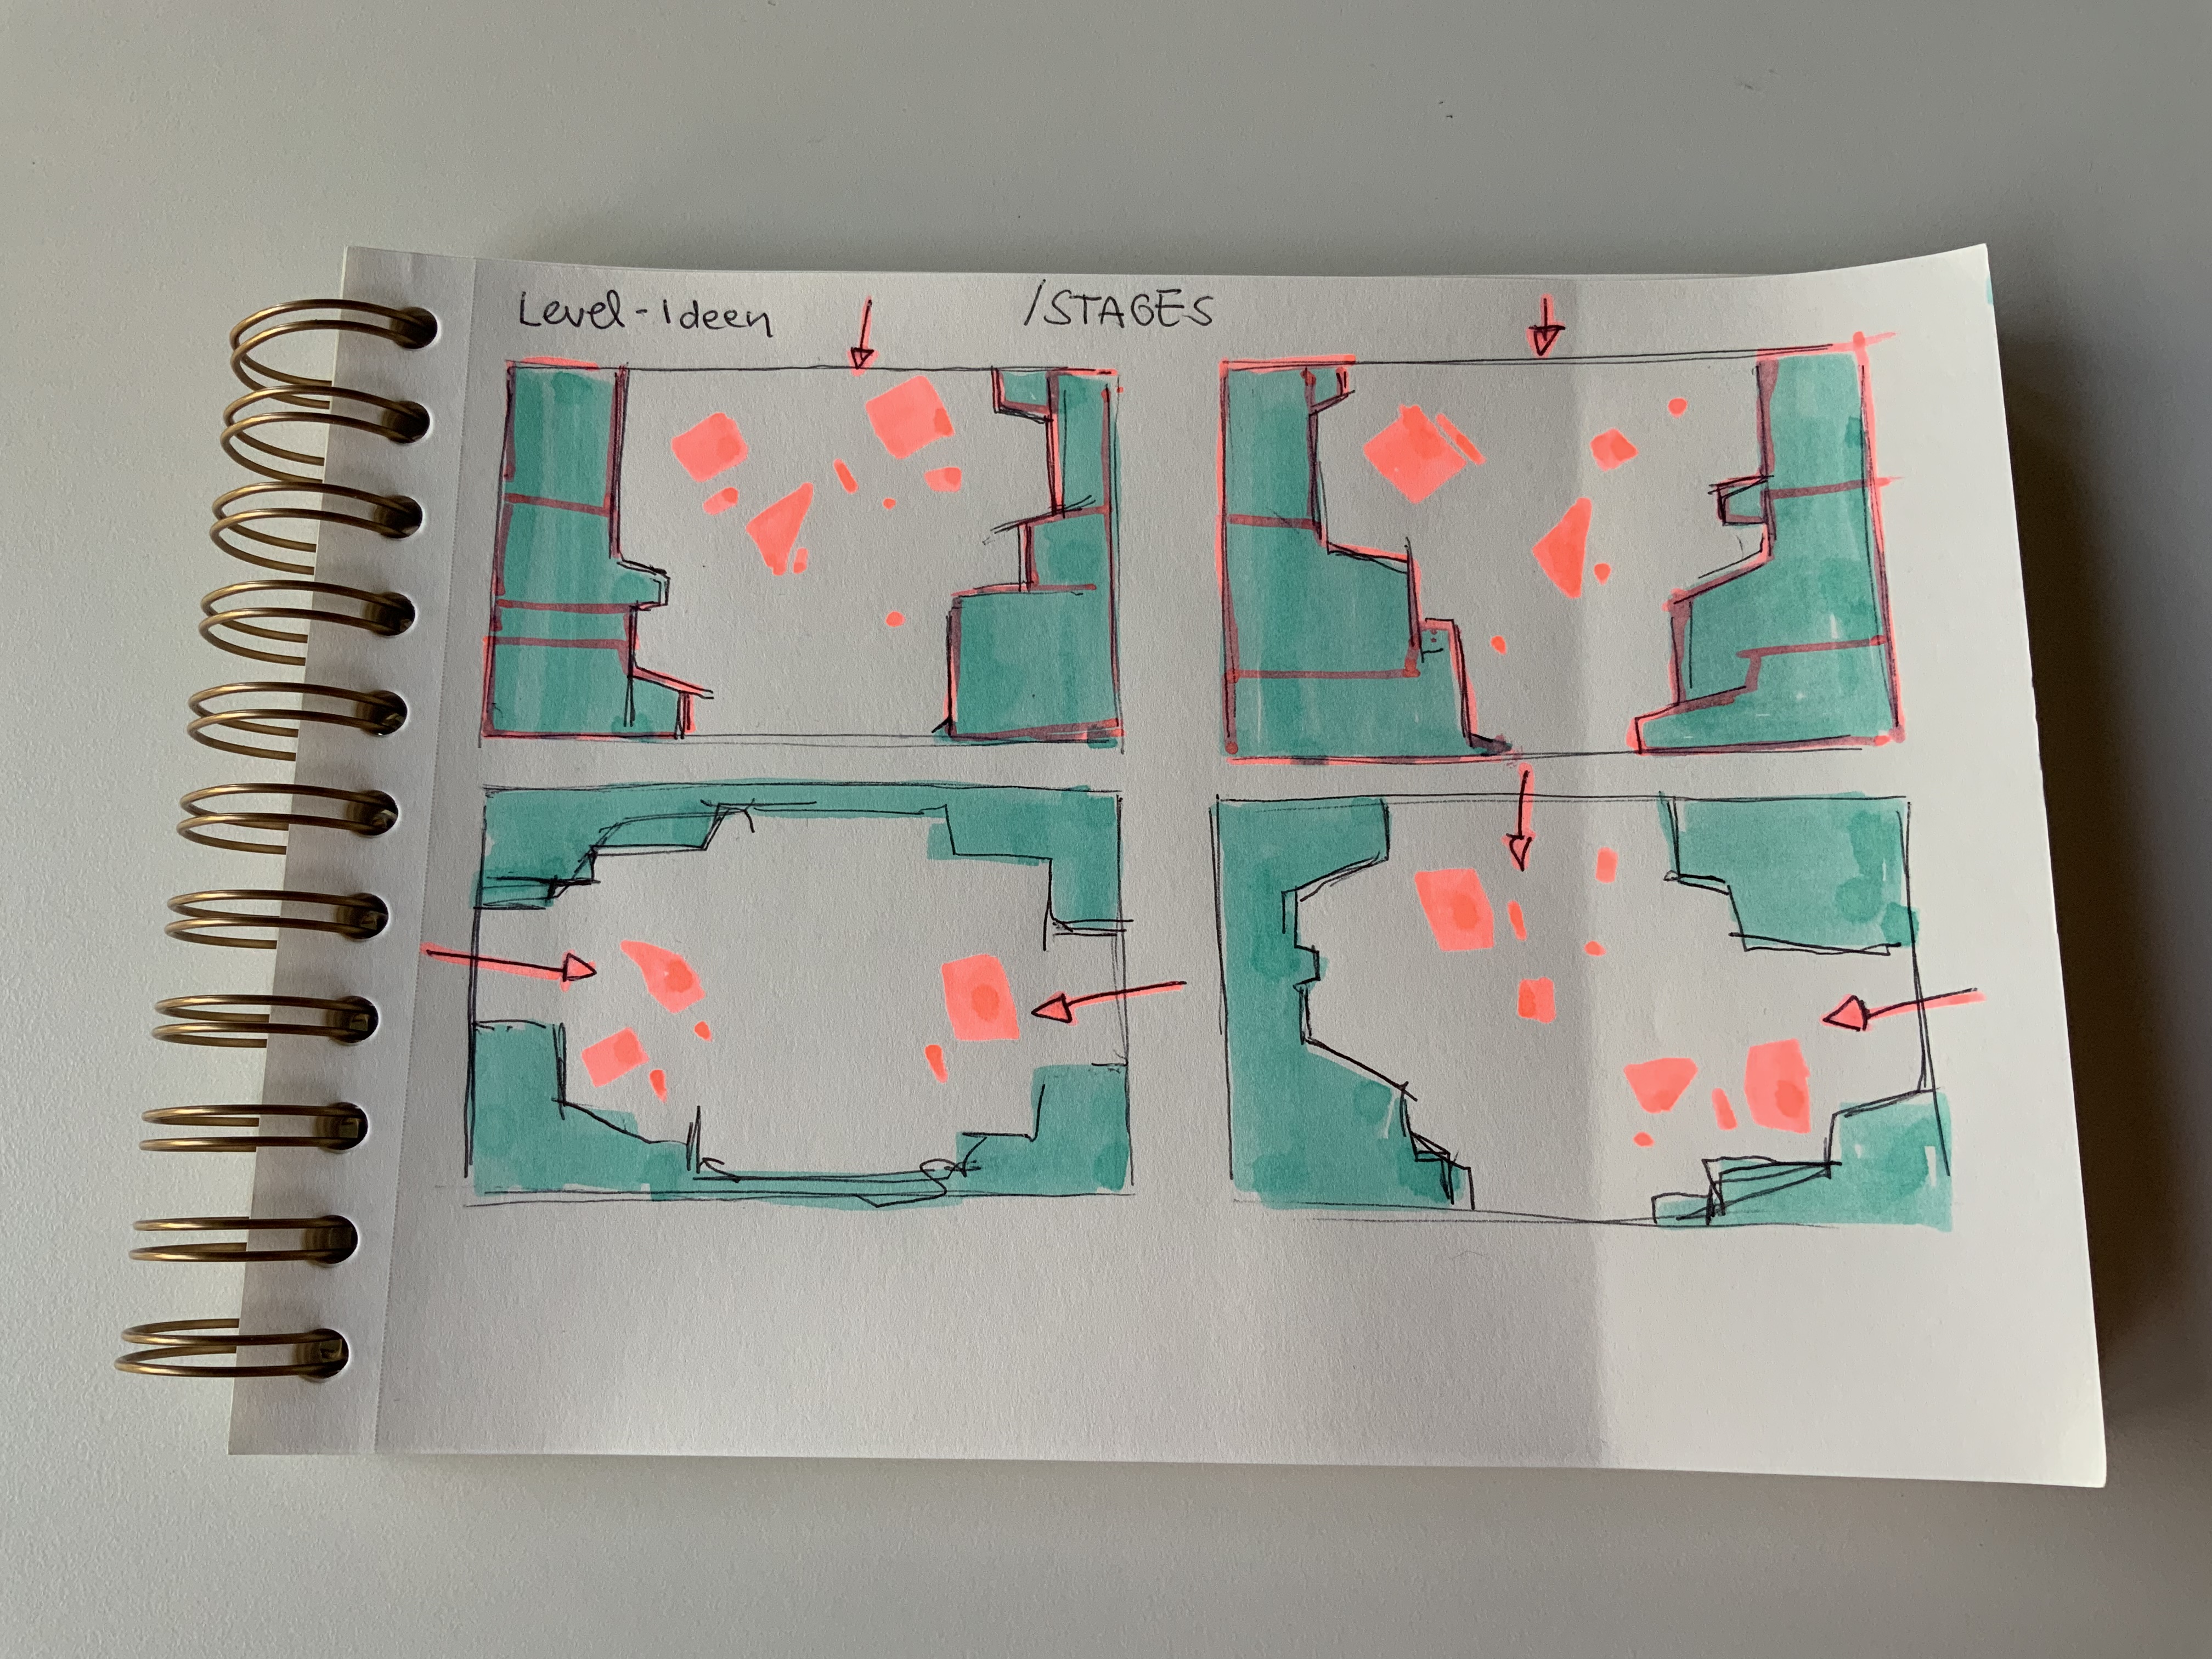
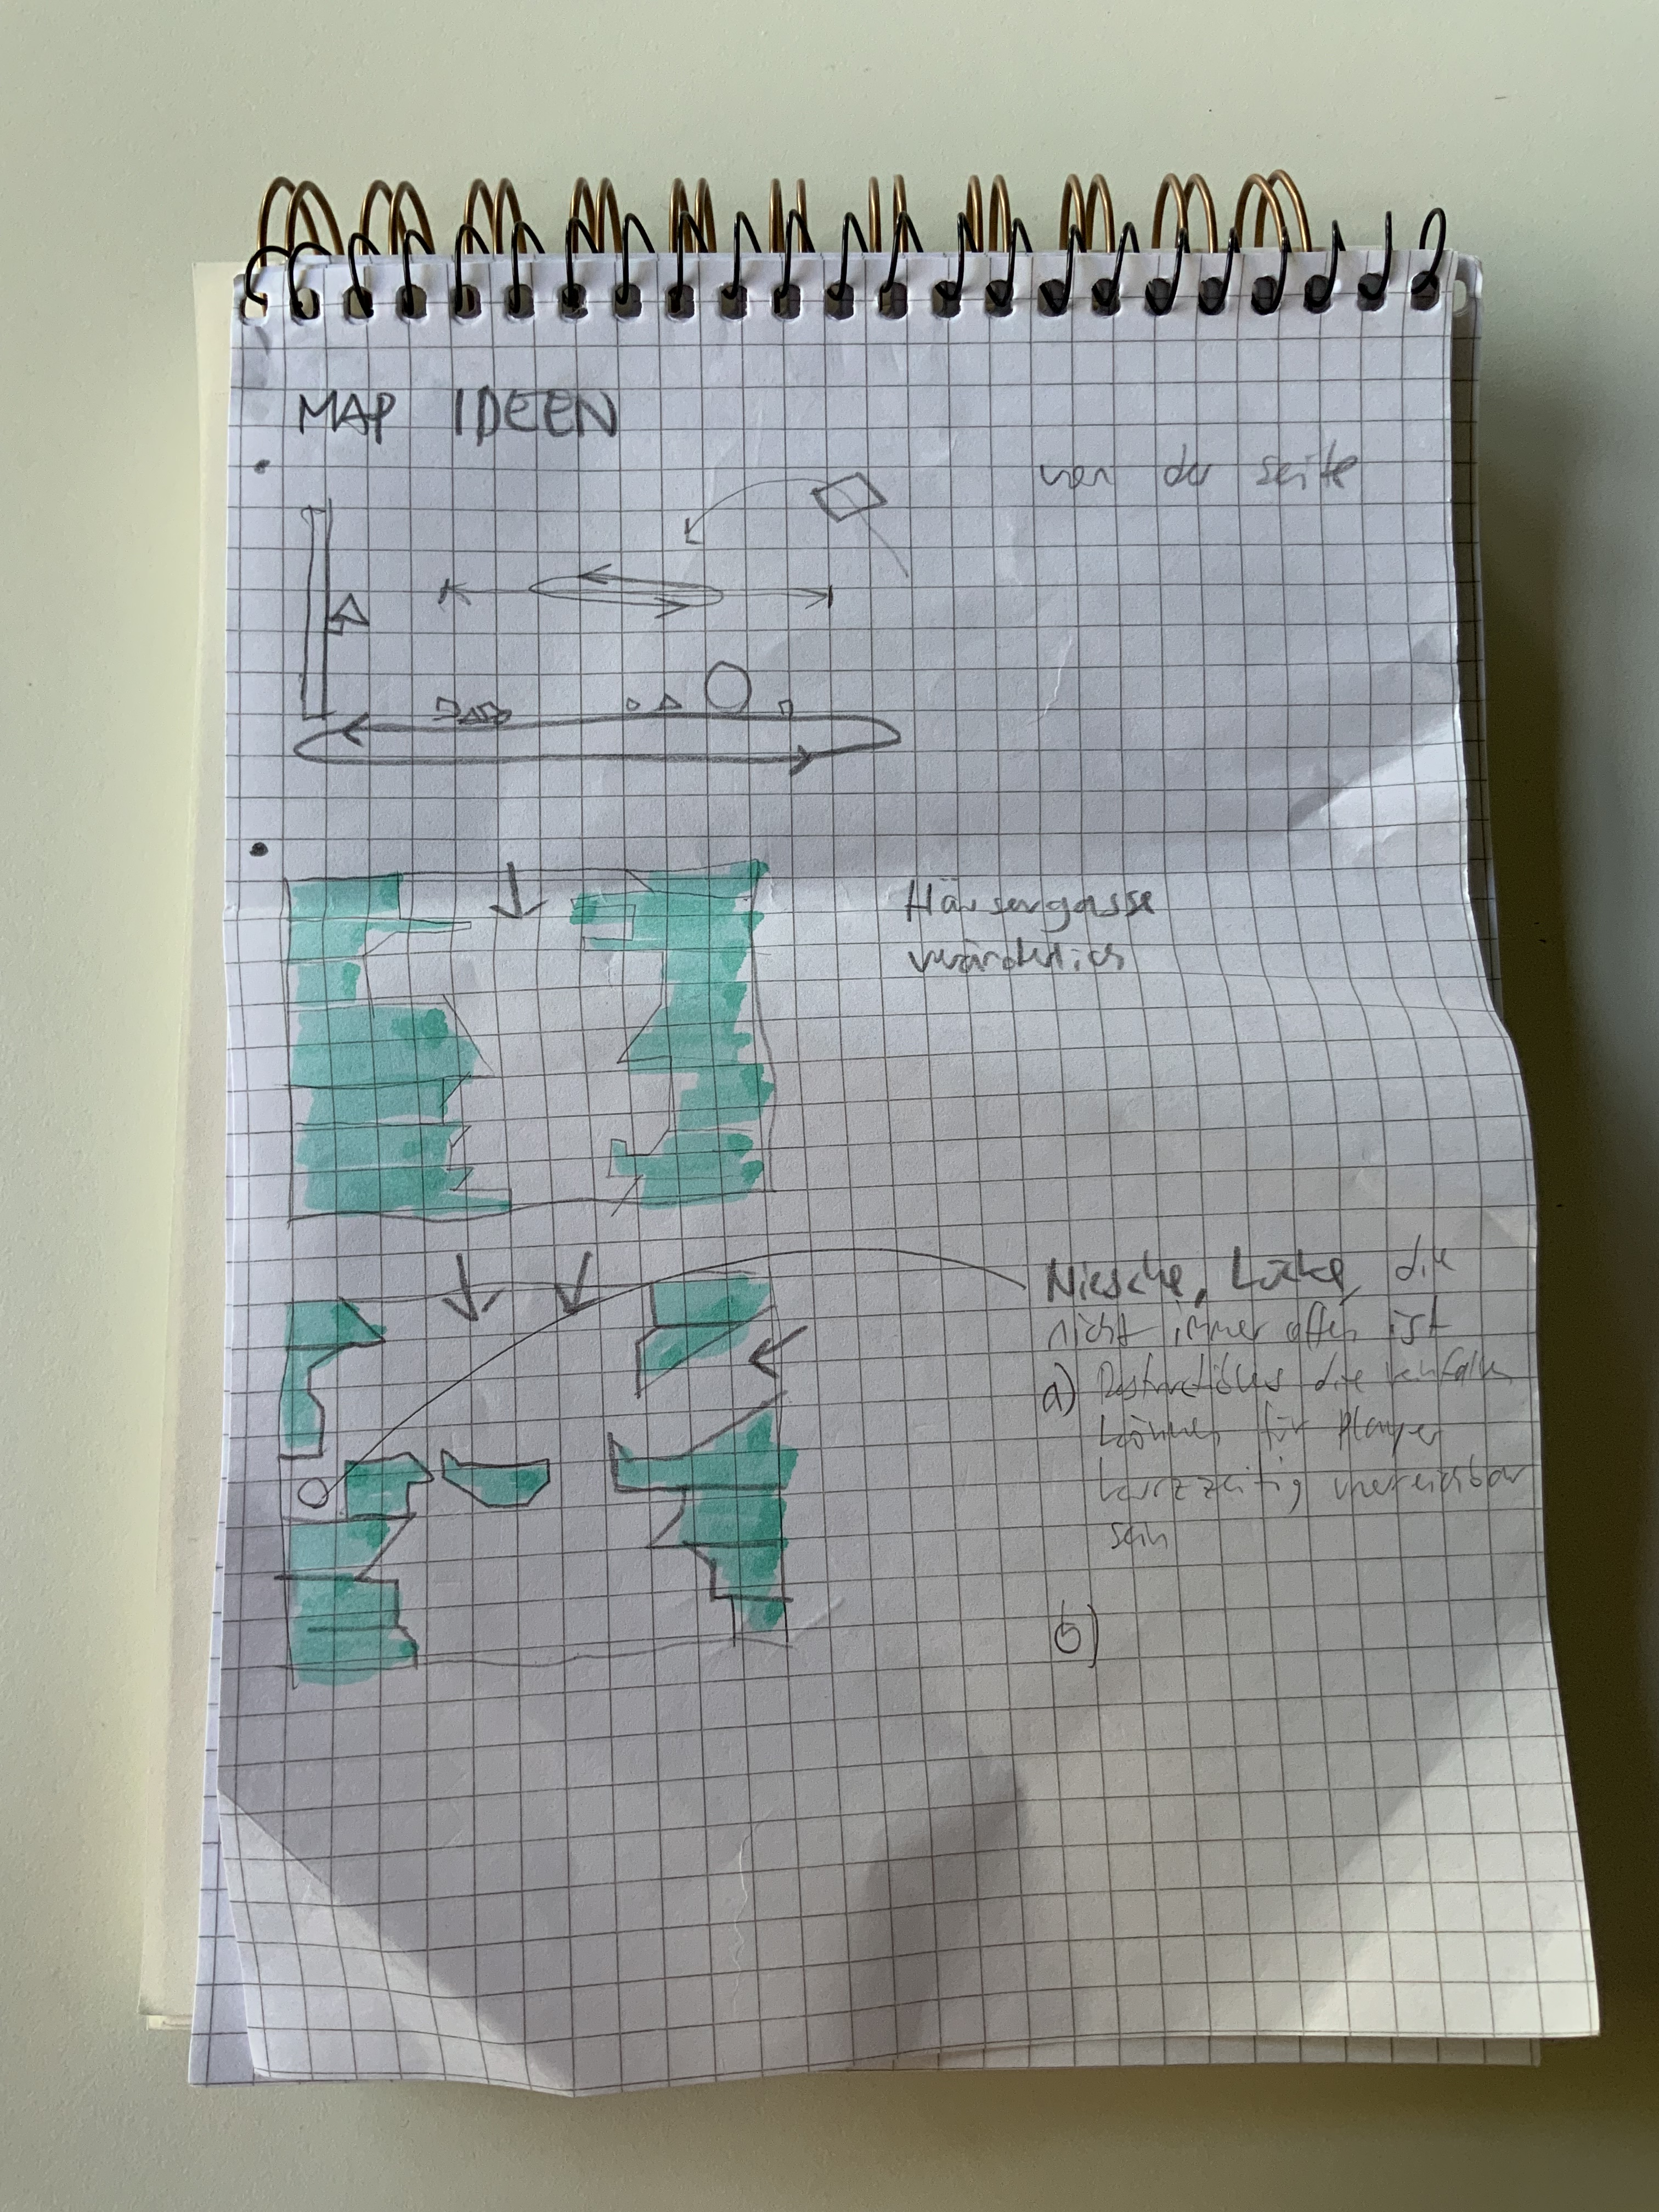
Our team engaged in a series of productive thought experiments, constantly building upon each other’s concepts. We mainly designed on an analogue basis to quickly convey our thoughts and ideas, while giving others the opportunity to engage with the concepts hands on.
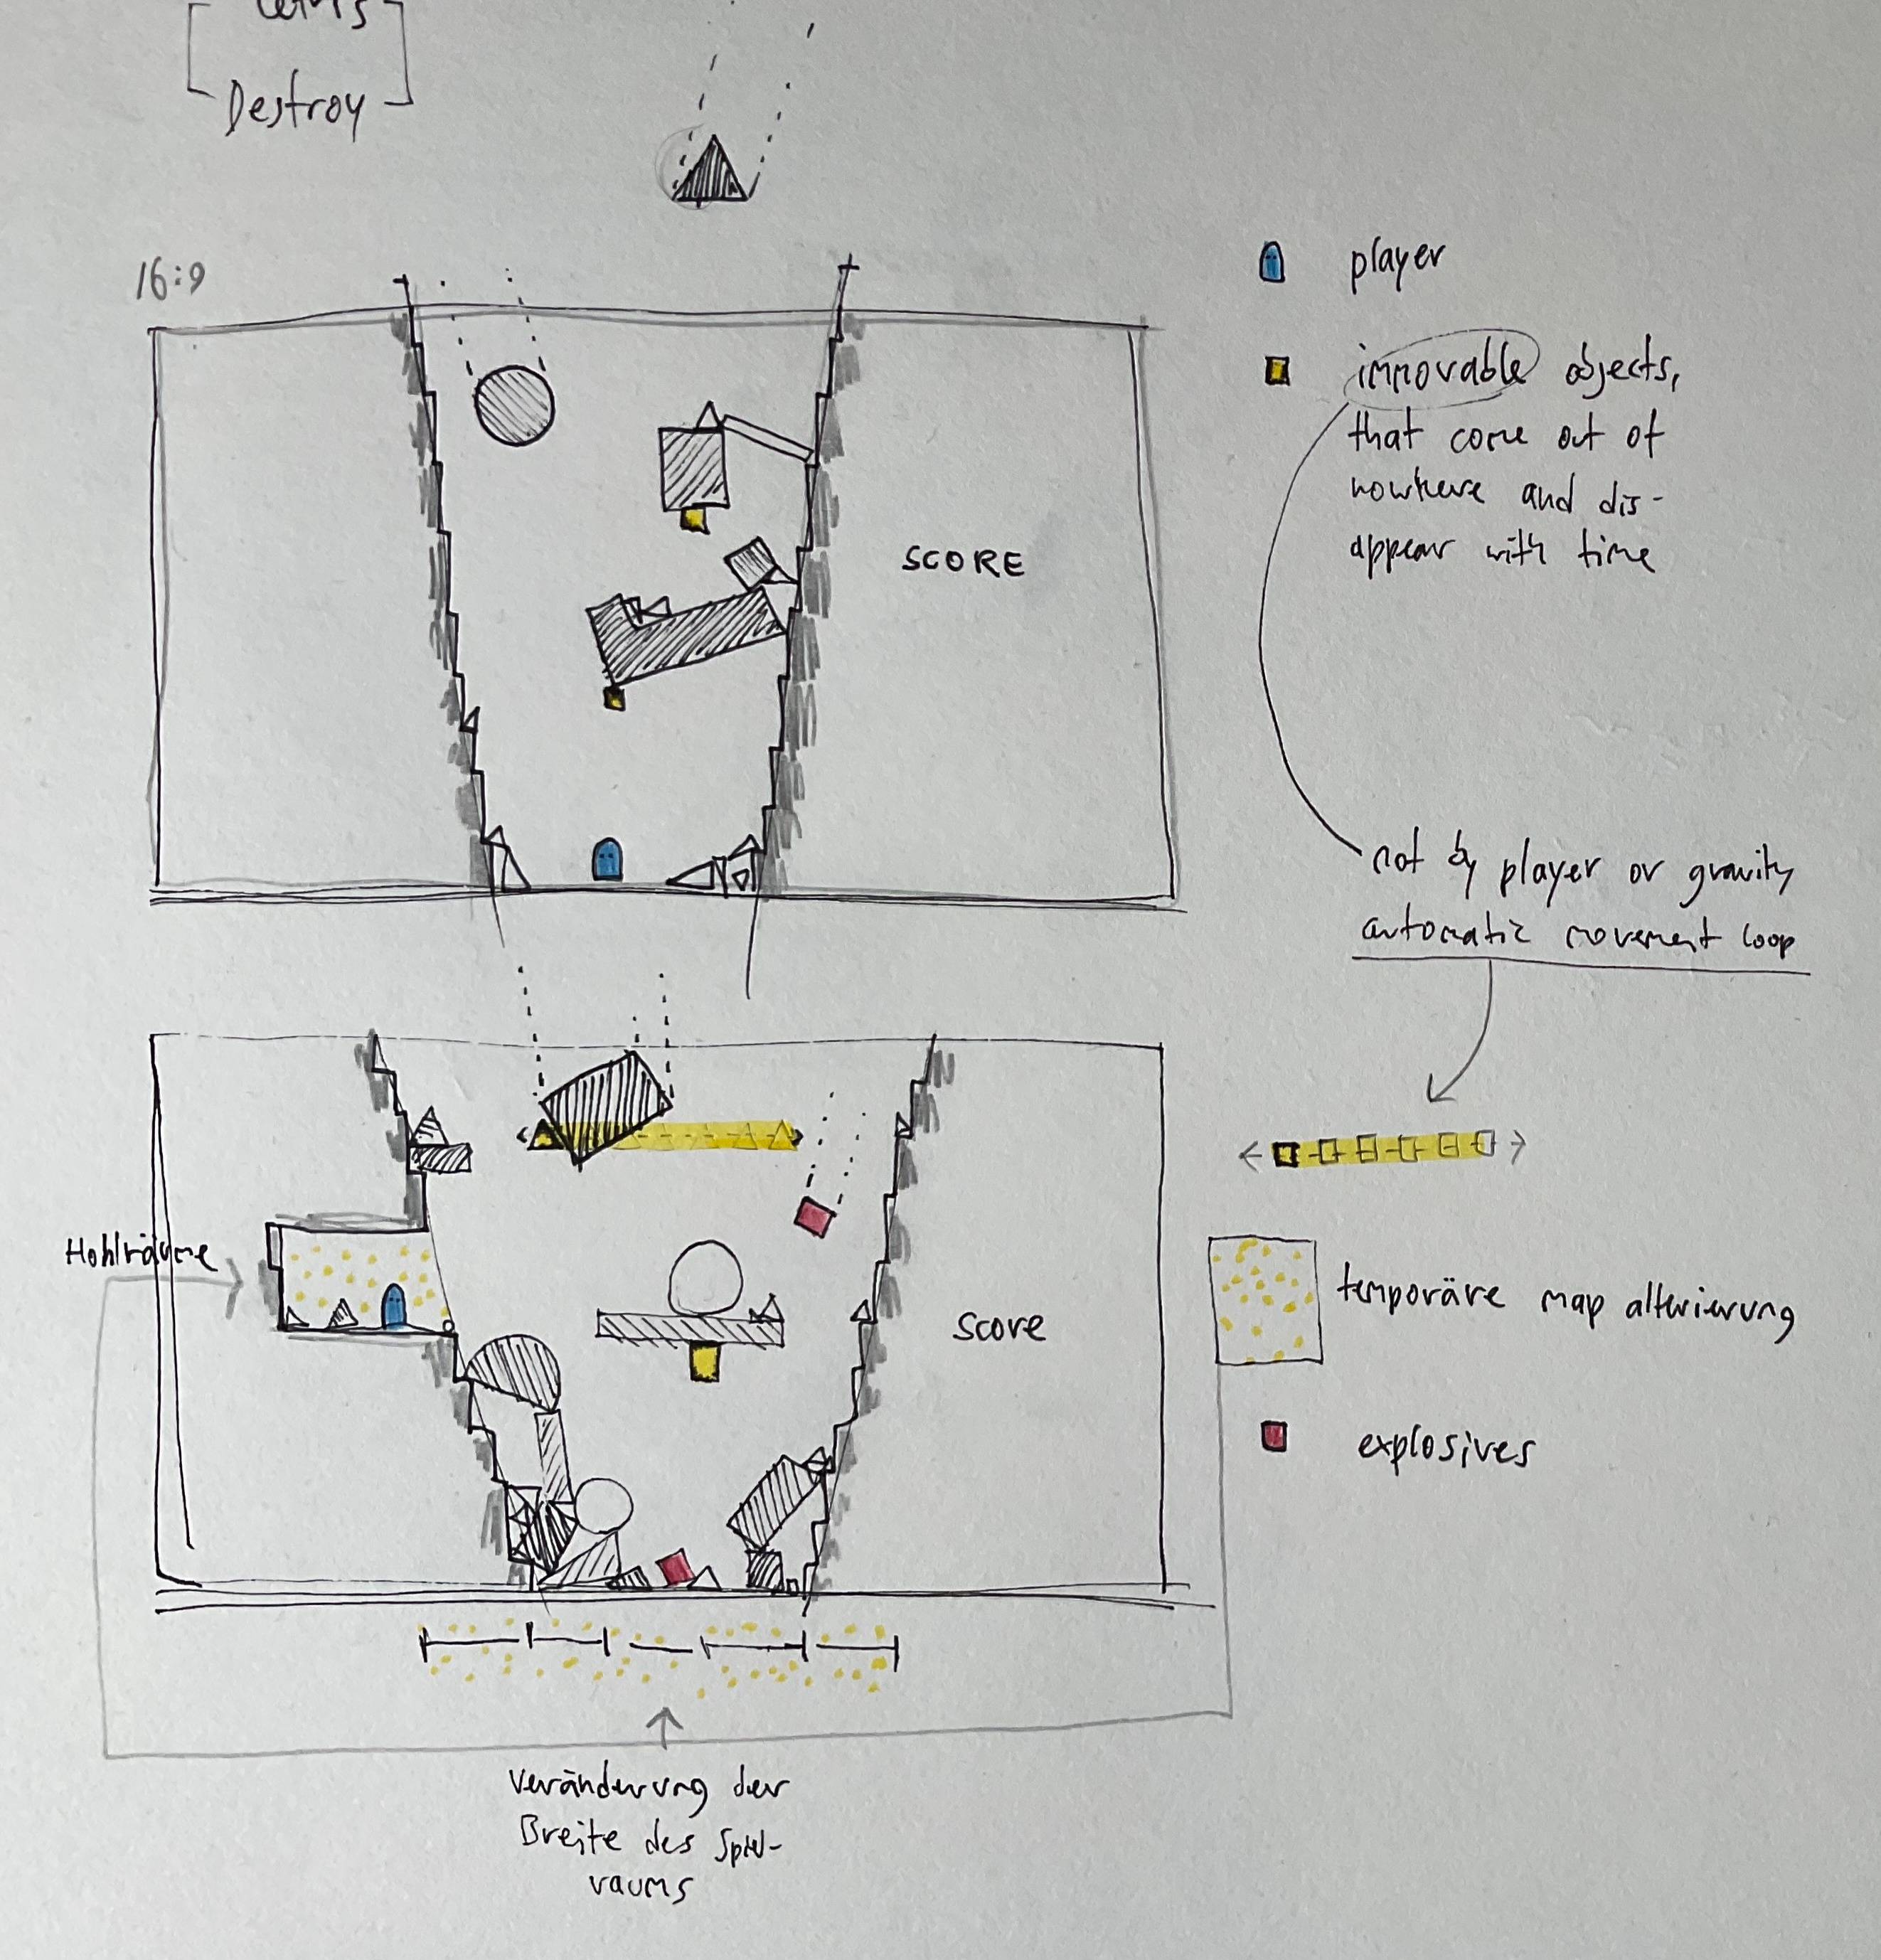


Solution
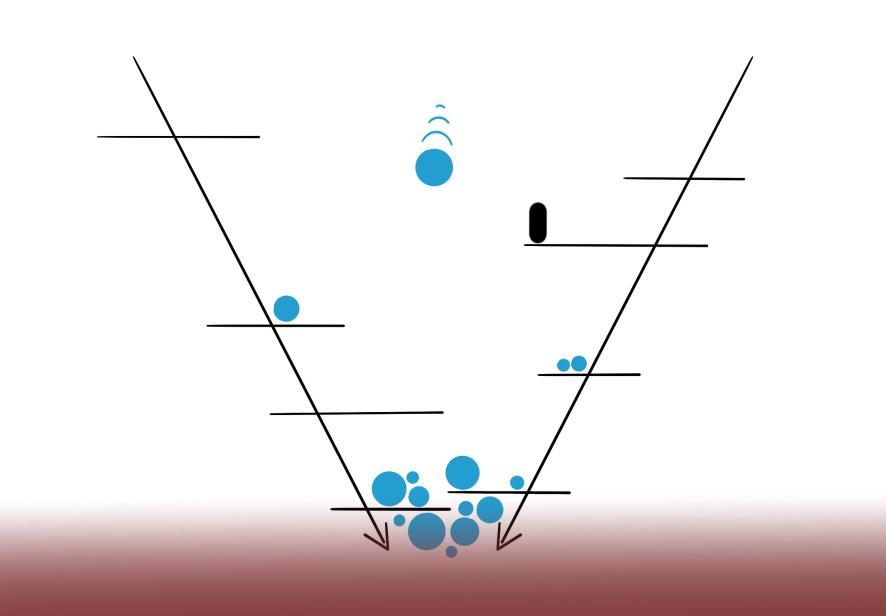
After addressing various challenges, we culminated a plethora of diverse ideas to craft a solution that harmoniously combined different elements. Central to our design is a V-shaped Pit that serves as the game’s physical layout. The steep side walls feature Platforms for both landing and takeoff. These walls gradually move towards the pit’s bottom. Being trapped in the pit results in a player’s demise, compelling them to explore alternative strategies. Survival alone yields no points. The dynamic gameplay involves Targets descending unpredictably, each with its own torque and speed attributes. Players can jump against these Targets to fragment them into smaller versions, earning points in the process. The scoring system introduces complexity: smaller targets offer fewer points, while successfully initiating a combo by consecutively hitting targets enhances the score multiplier. The combo is maintained as long as targets are hit within a brief timeframe.
The pivotal aspect lies in the pit, the riskiest zone where most targets land. To maximize points, players must:
- Master mid-air target hits through skillful jumping.
- Sustain their combo with timely target interactions.
- Embrace calculated risk by venturing into the pit, where the majority of targets reside.
- Keep smaller targets within reach to keep up to replenish their combo when in need.
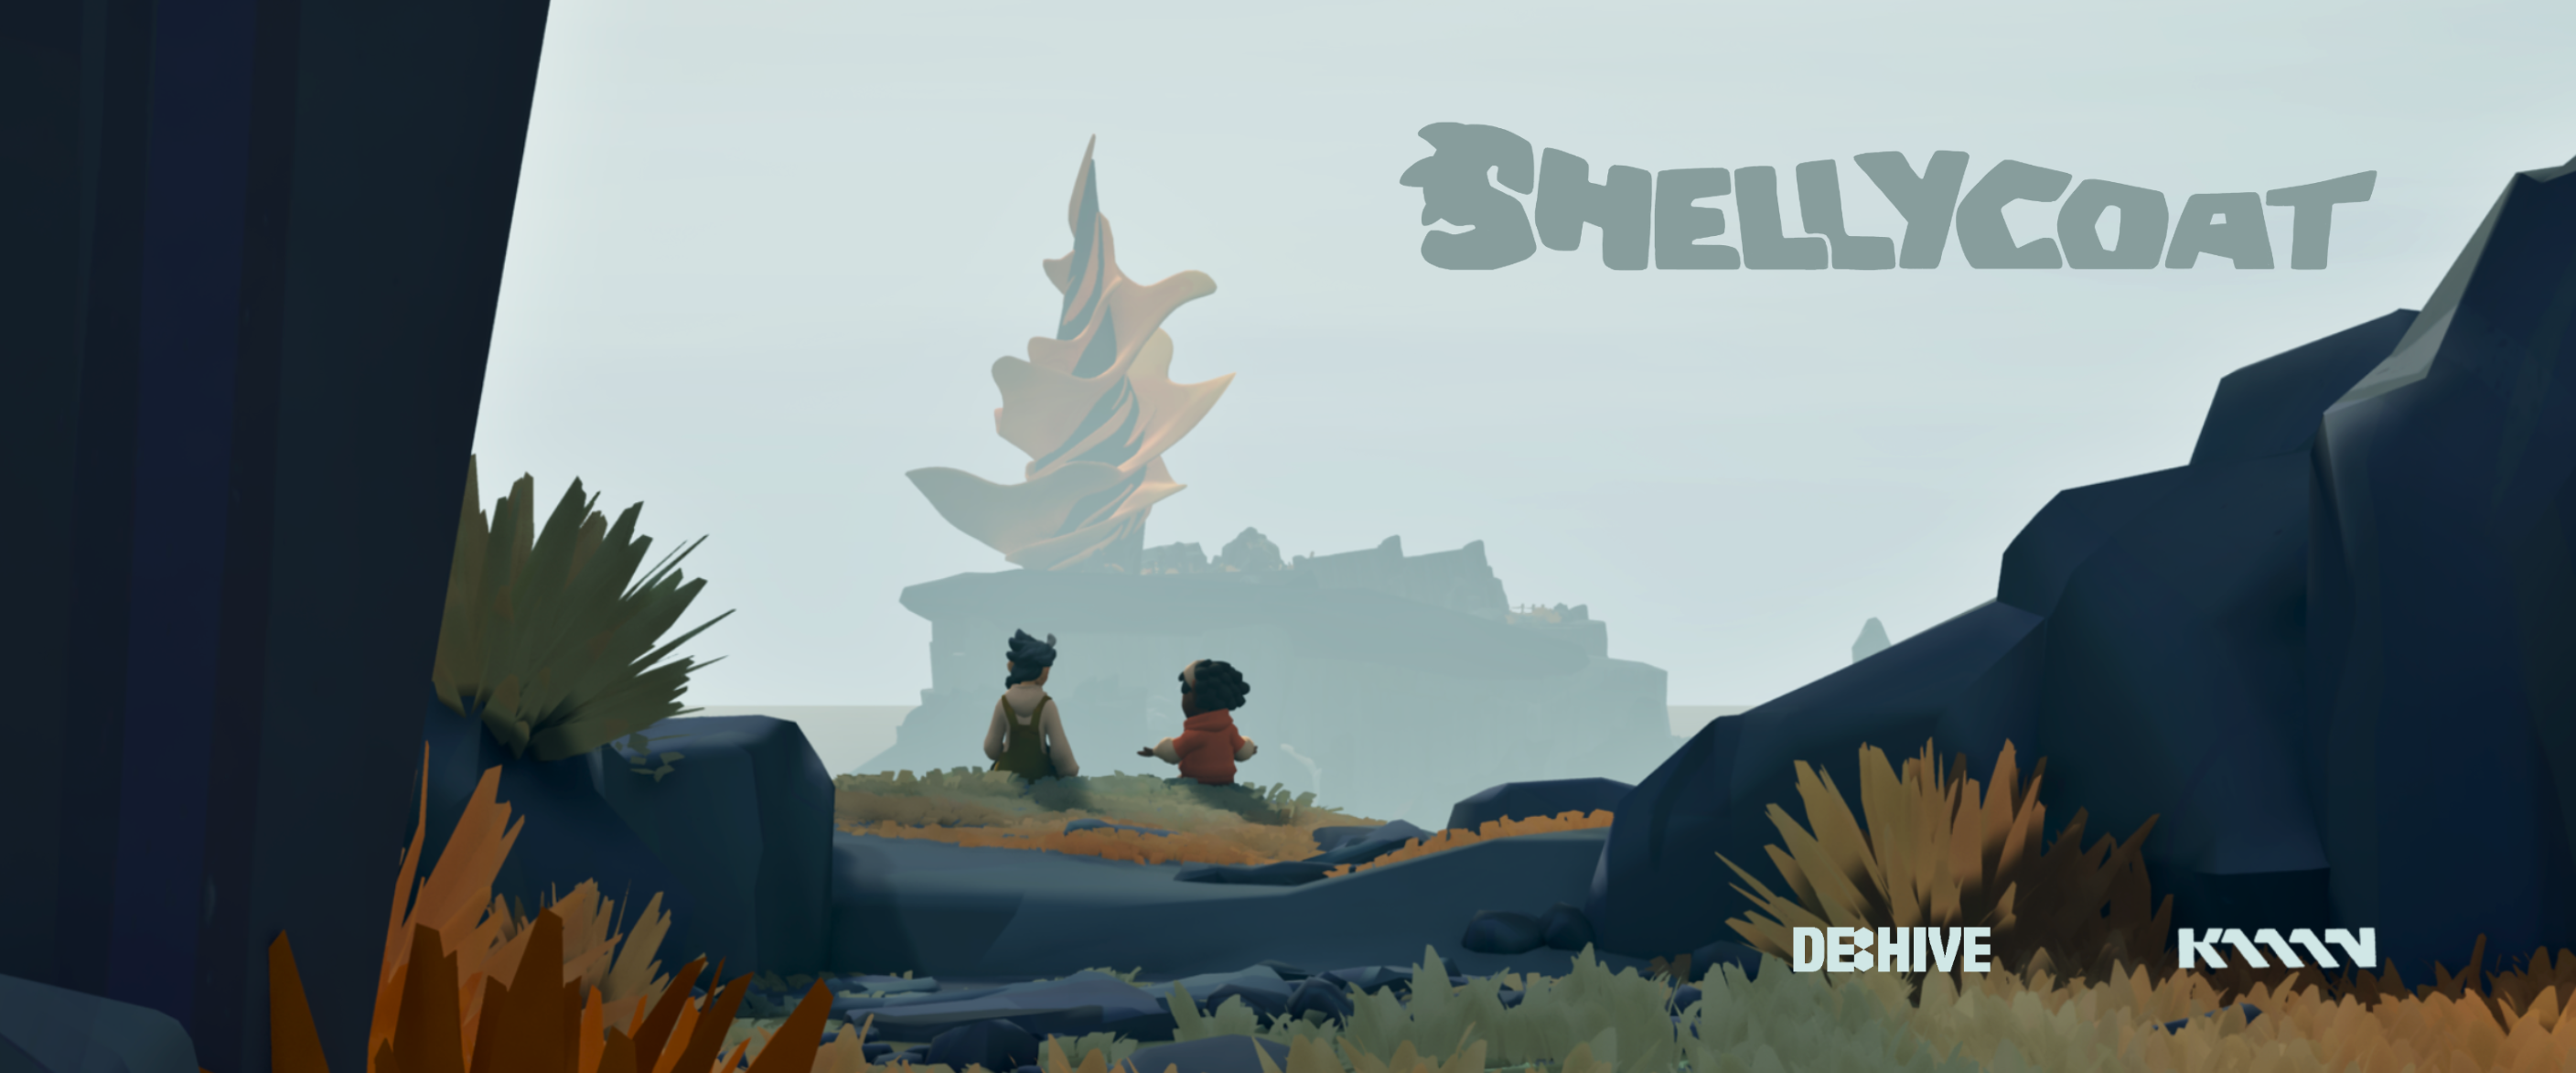
Shellycoat
Vikor Gjorgjeski, Oskar Lazar, Hana Rensch, Leon Schurer, Melina Weber @ DE:HIVE
2024 / 3D narrative action adventure platformer – downloadable on itch.io
Gameplay Trailer
Demonstrates:
Character Controller Design
Role:
System Designer,
Programmer, UI, UX
Time:
4 months
Character Controller Design
Challenge
Shellycoat is meant to be played by a child / young adult and their grandparent. This intergenerational experience requires a nuanced approach. The narrative is targeted to the grandparent, while the gameplay is targeted to the child. It has to be
- Playable, fun, and challenging to a digitally native kid
- Enjoyable and understandable to watch for a person from older generations.
Solution
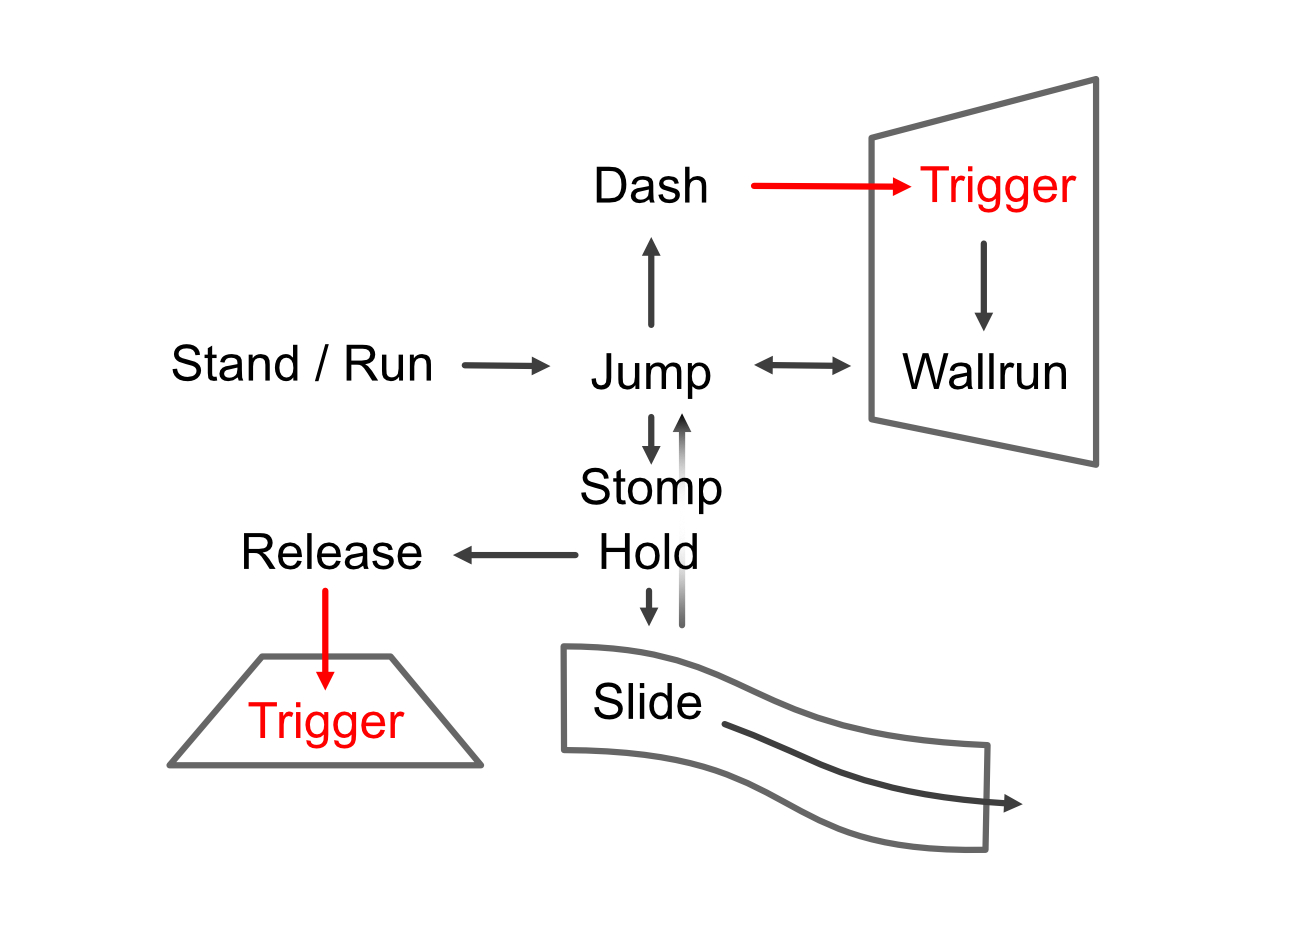
After toying with a simpler input system, I expanded the input and associated level design requirements to the following:
- South button / Spacebar: Jump
- Right Trigger / Left Mouse Button: Dash
- Left Trigger / Left Shift: Stomp / Slide
Jumping onto walls results in an automatic wallrun, which can be jumped out of. Dash or stomping onto surfaces can “trigger” special environmental shifts required to advance levels. Hold Stomp on slanted surfaces allows one to slide.
This setup fulfilled our criteria above successfully with our testing groups.
Obscrete
Oskar Lazar, Kathi Pöttrich, Hana Rensch, Leon Schurer, Fabian Wislsperger @ DE:HIVE
2022 / first person puzzle – downloadable on itch.io
Demonstrates:
Level Design, Programming
Role:
System Designer, Programmer
Time:
4 months

Level Design
Challenge
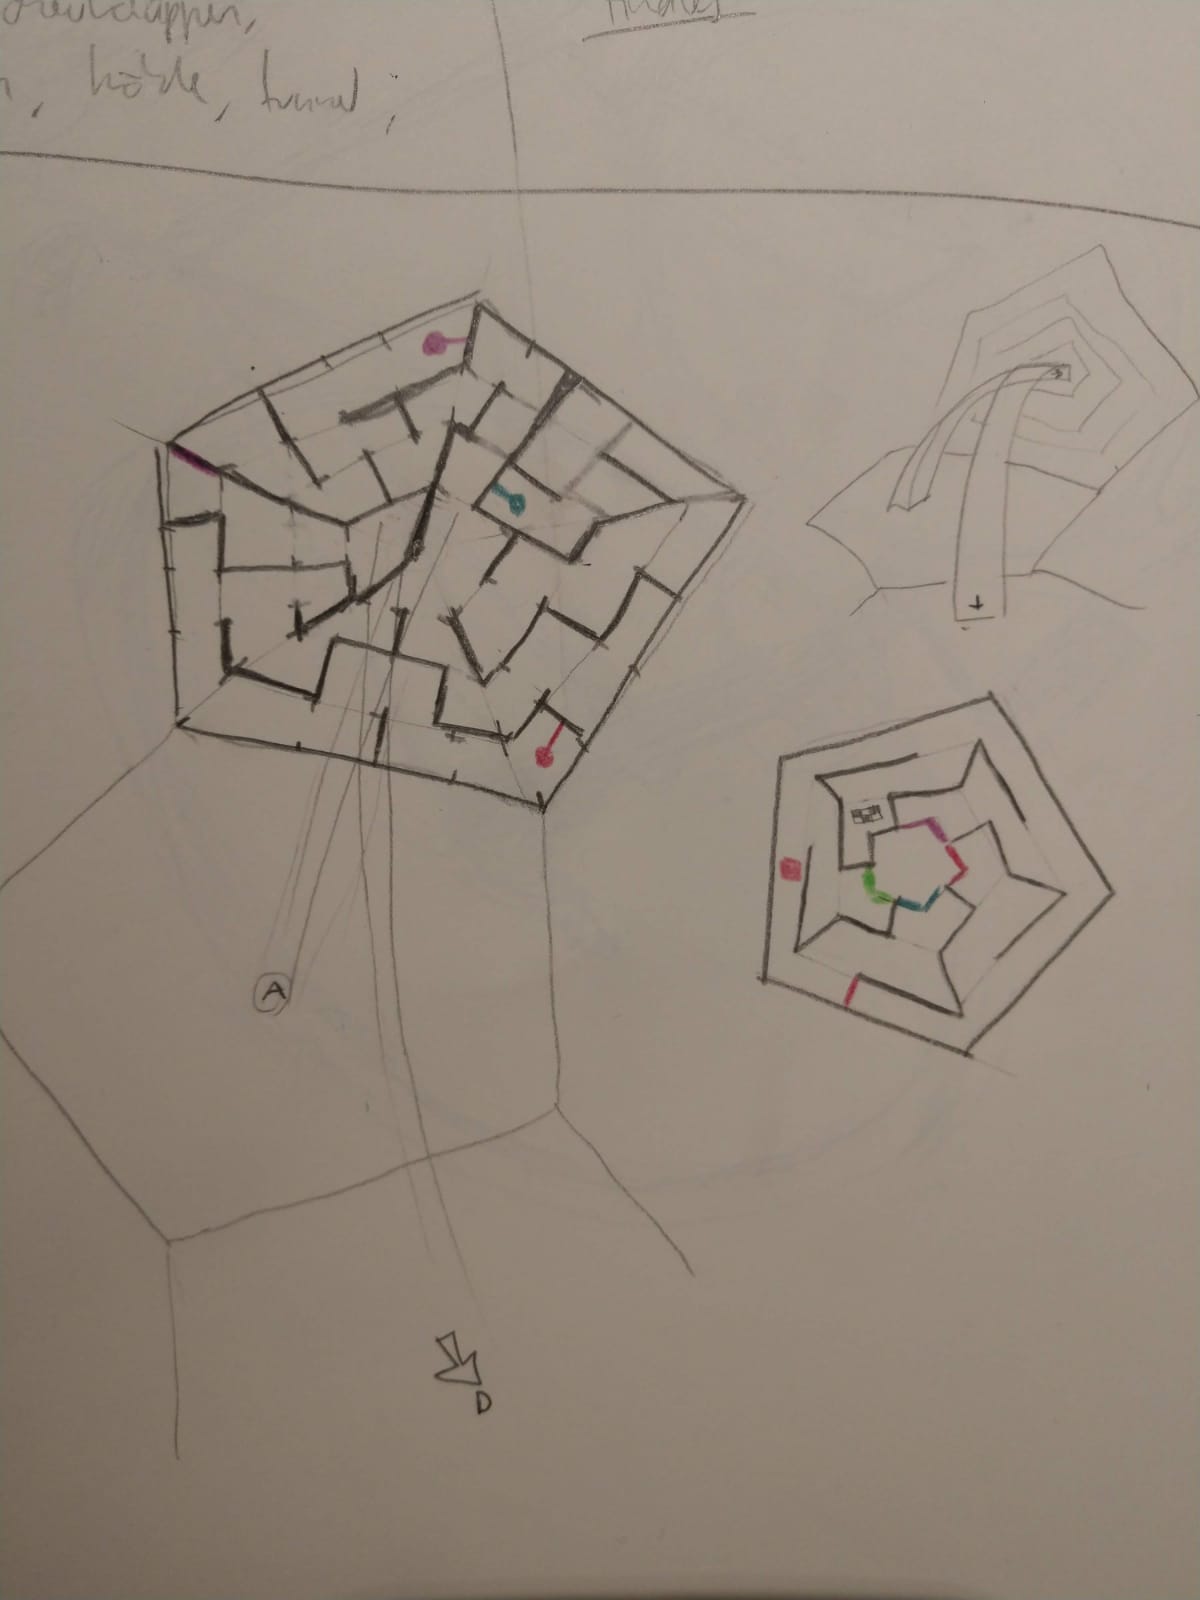
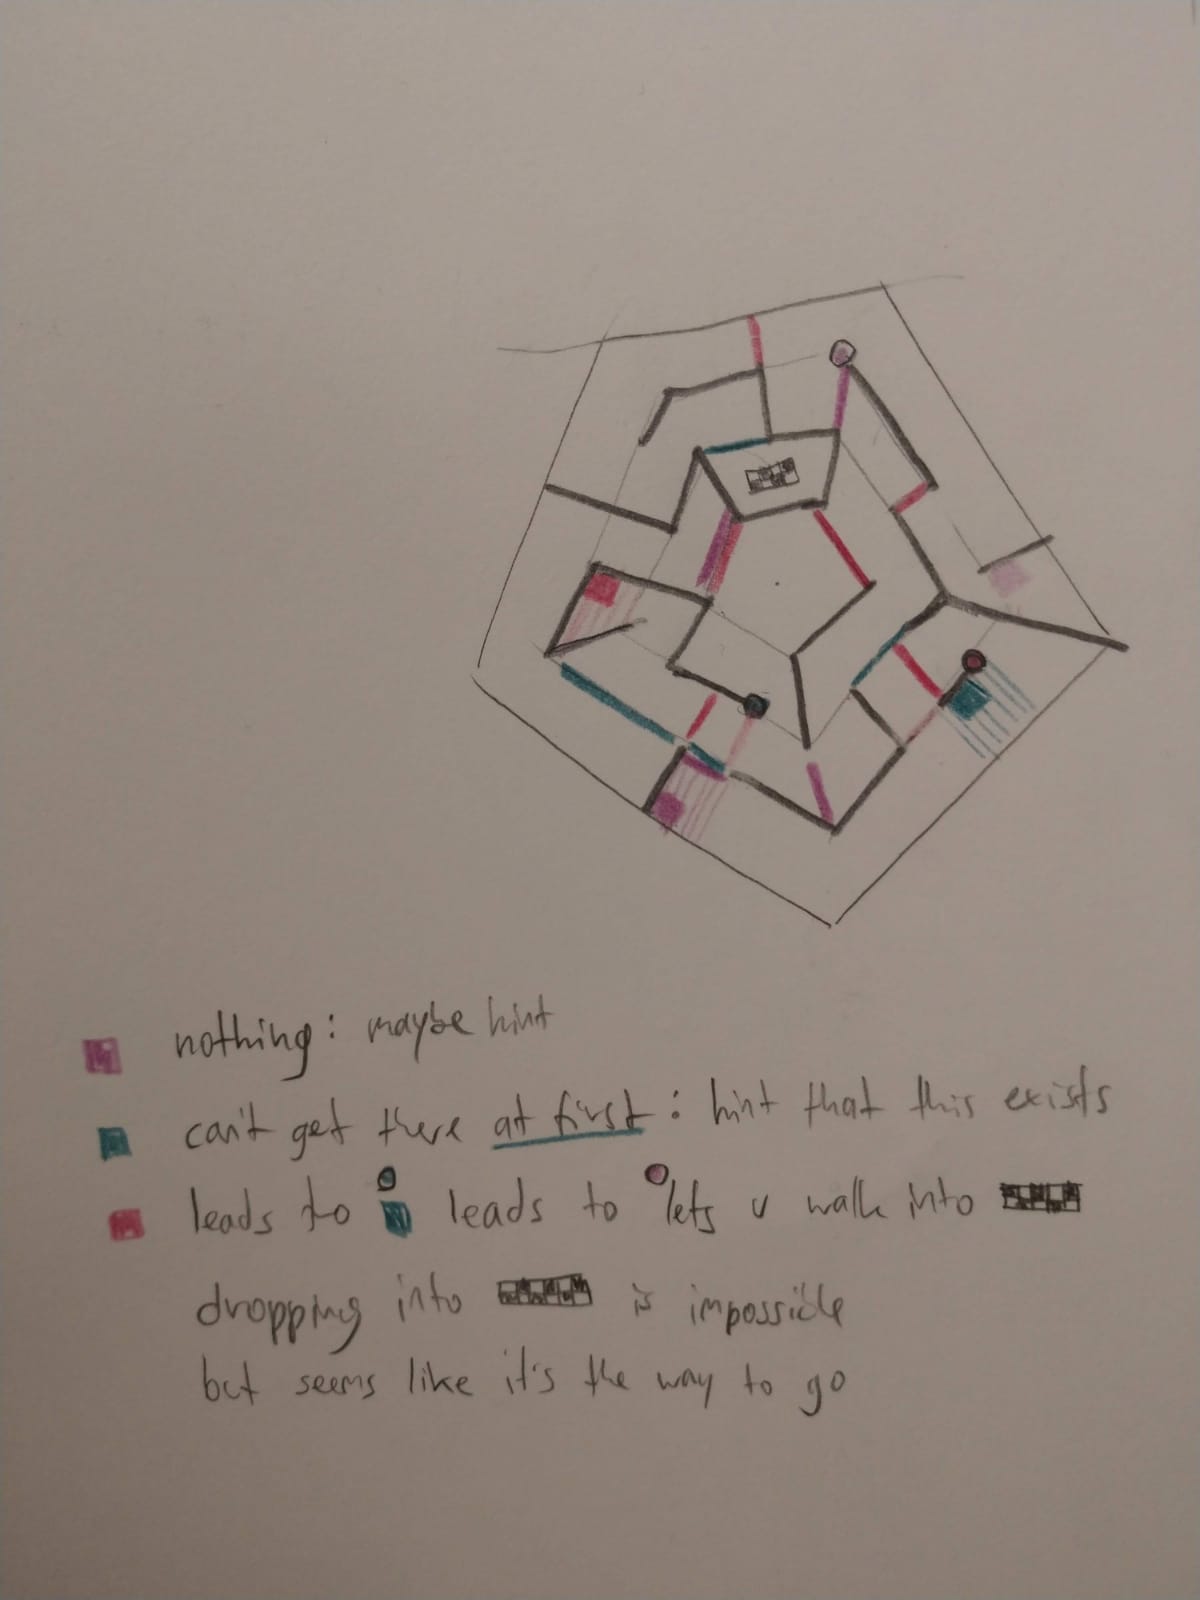
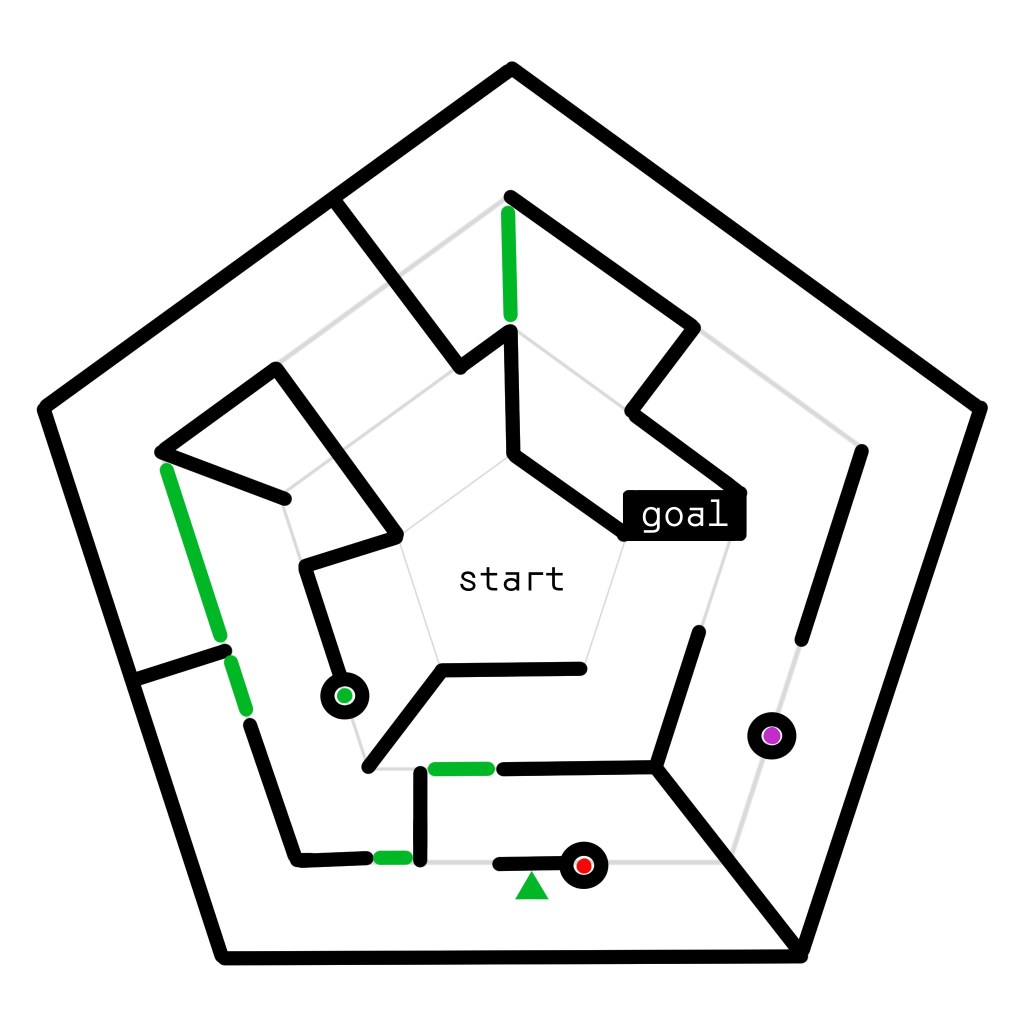
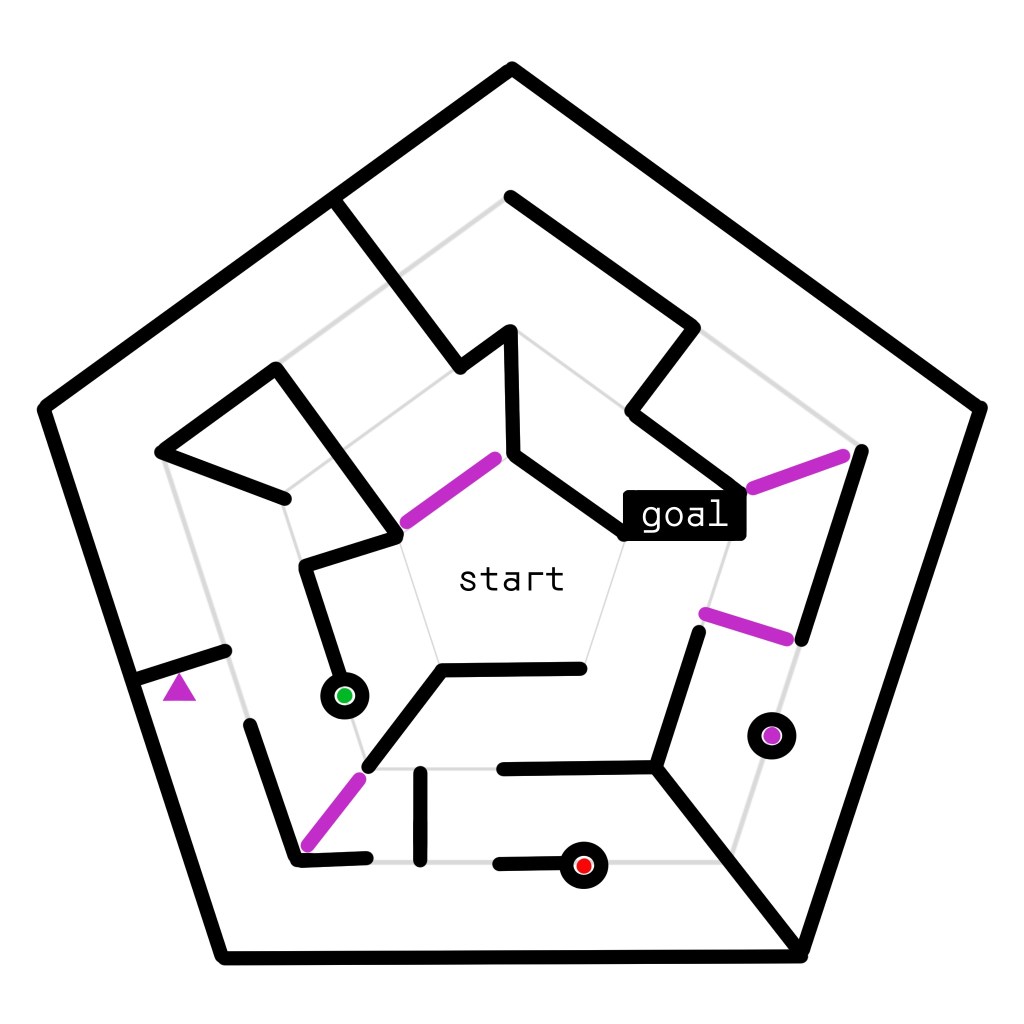
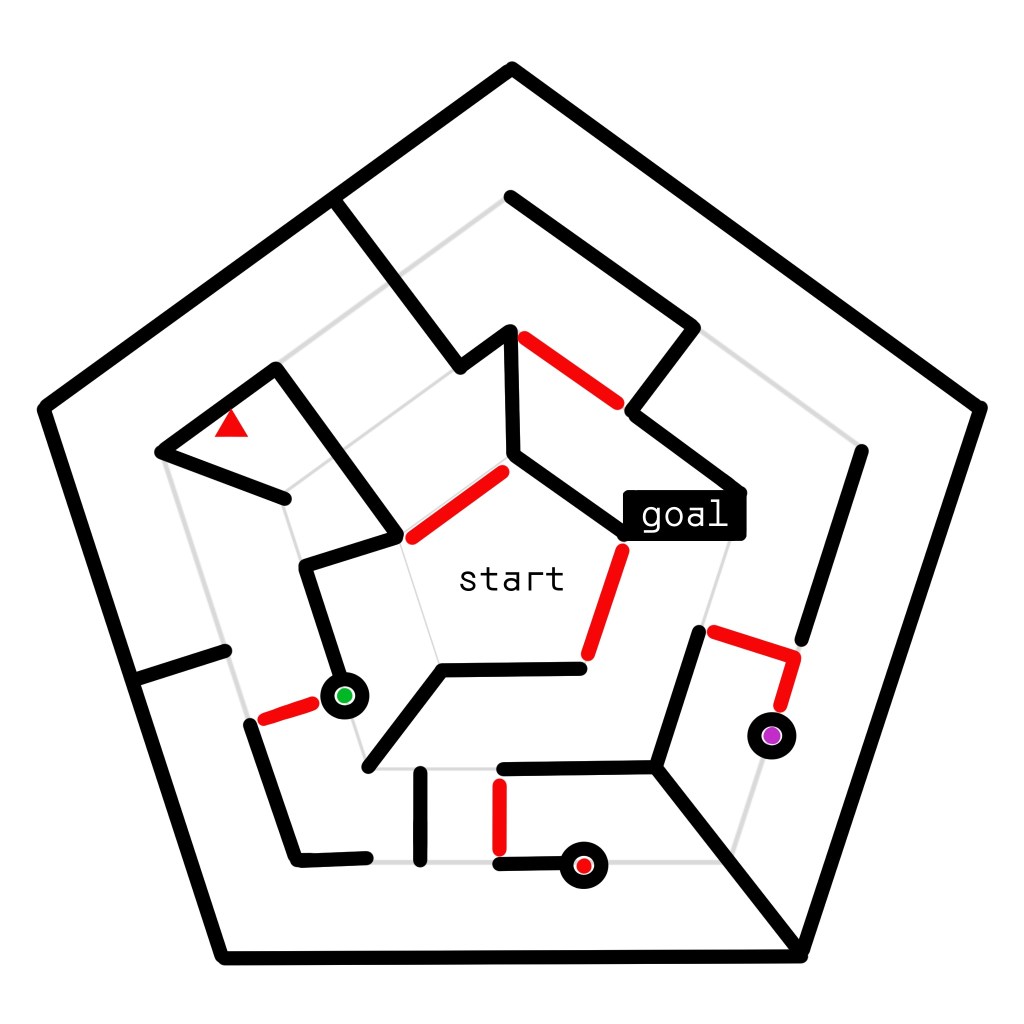
In Obscrete, the mechanic is that by pointing at a trigger, you can activate and deactivate objects. One trigger will automatically be deactivated if you activate another. These objects are invisible and intangible while inactive. The plan was, that out of our 6 levels, this level would be the second to last one, with all our main mechanics already introduced, namely also the parkour aspect.
Our second main mechanic was the ability to change the players gravitation (More on that under “Programming”) This level was supposed to make the player understand that this can help them plan and strategize on which gravitational pull to gather what kinds of information.
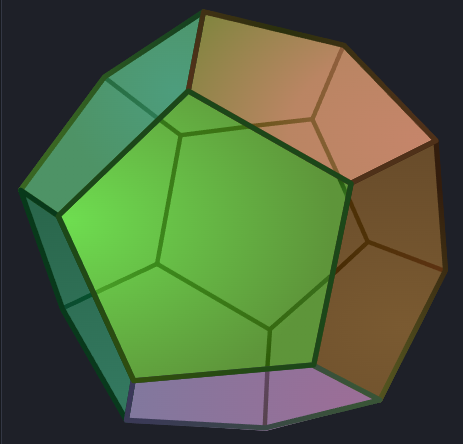
Moreover we were already settled on having penthagonal grounds for every level. The reason for this being our dodecahedral room in which all our levels take place, with gravity changing multiple times between as well within levels.
Workflow
I quickly realized that I could achieve such a knowledge based challenge by making a labyrinth. A player would have to think of how to get to their goal from outside the labyrinth itself before actually engaging with it. I designed the entire labyrinth by hand and the digital execution worked without unexpected hiccups.
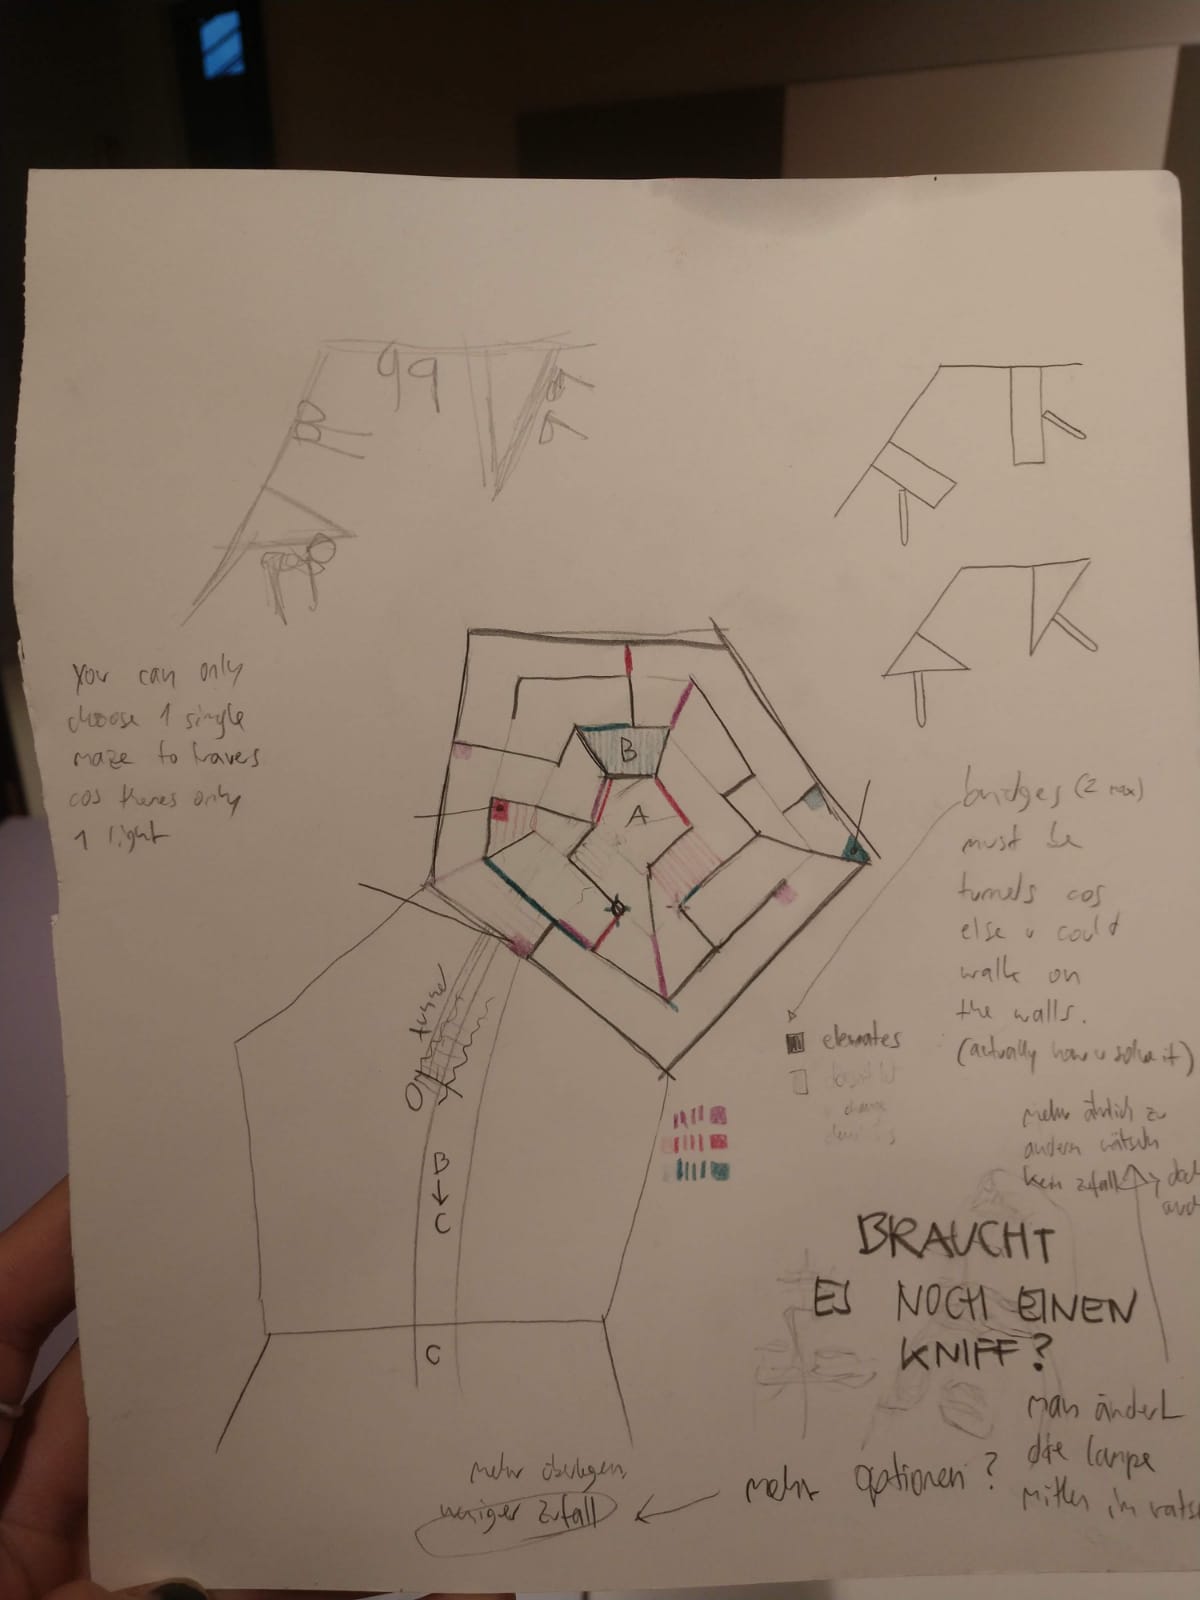
Solution
In order to strengthen the levels core feature of interacting with it from inside and outside I established that all triggers would only by usable from outside the labyrinth, giving the player a choice before entering it.
I decided that the number of triggers was 3, to ensure an adequate level of challenge.
Most importantly, the final design included a new way of using a labyrinth. Approximately halfway through the level, you were forced to make an unexpected choice. Namely, to climb on top of the walls, that would previously hinder you. The most interesting part about this was, that all the (de-)activatable objects that would previously stand in your way were now a new path. Whether the play would find this part out while learning the labyrinth’s ins and outs from above or from within, it was a difficult challenge to surmount without planning on which triggers to have to active at which point.
This prompted another challenge to me: I need the player to not have any triggers active whenever they reached the top of a wall. The solution to this problem is not central to the labyrinth’s layout however.
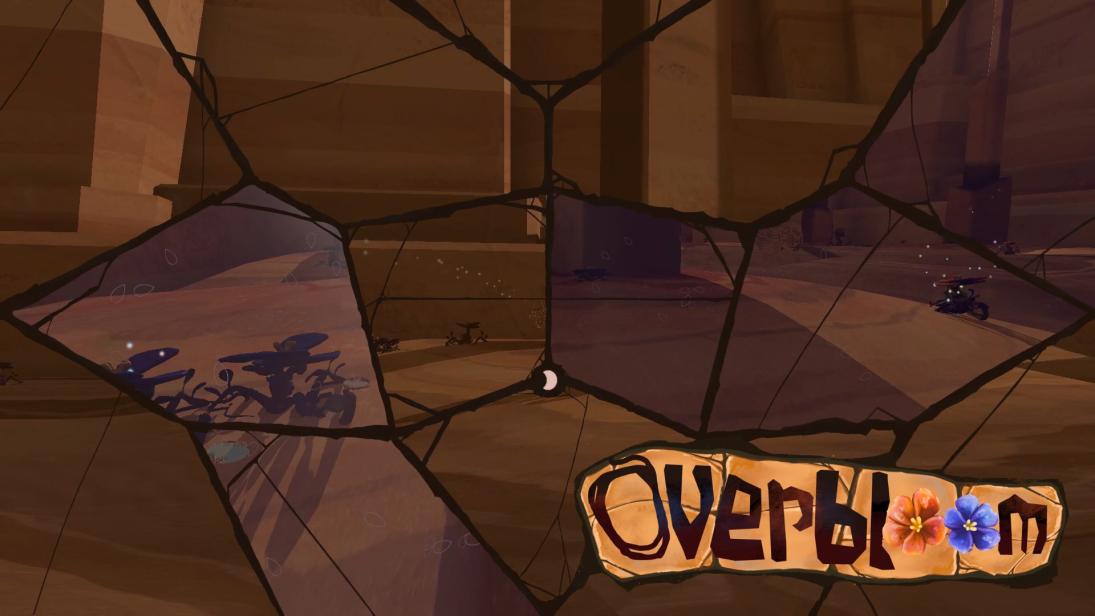
Overbloom
Oskar Lazar, Kathi Pöttrich, Fea Schirrmacher, Melina Weber, Fabian Wislsperger @ DE:HIVE
2023 / experimental first person shooter
Gameplay Walkthrough
Demonstrates:
Innovation, Technical Implementation
Role:
Programmer, System Designer,
Tech Artist
Time:
3 weeks
Innovation
Challenge
In such a short time period available for conception it can be difficult to find truly innovative ideas. In the game jam format we were stuck with 3 weeks and knew we were going to start working on our idea within the first day. We were also limited to a certain genre, word or context, ours being “shooter”.
What’s more is that we made a team decision to find a way to subvert the genre, while maintaining a competitive PvP environment. Mainly hoping to find a different focus from the usual combat scenario.
Solution
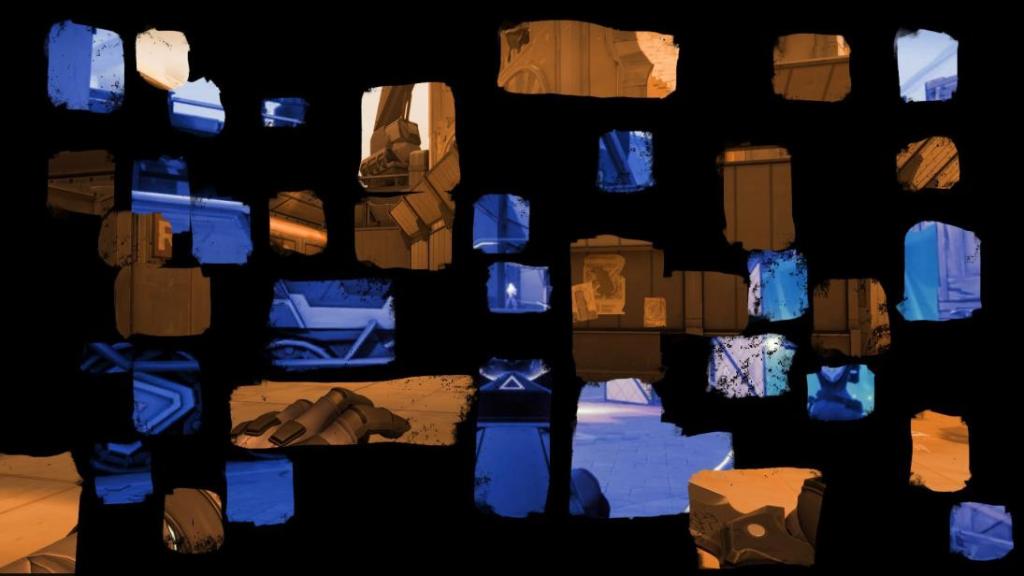
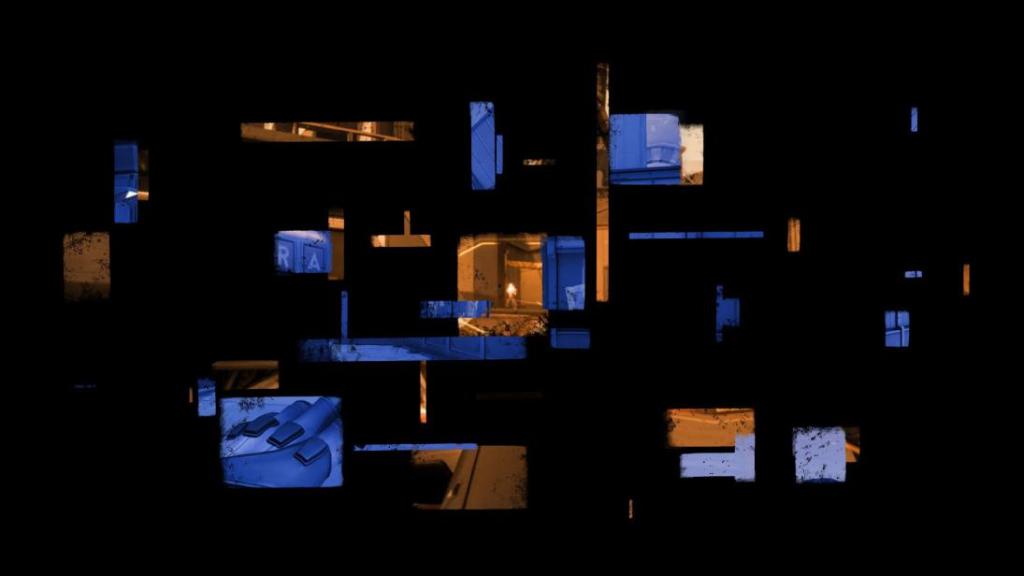
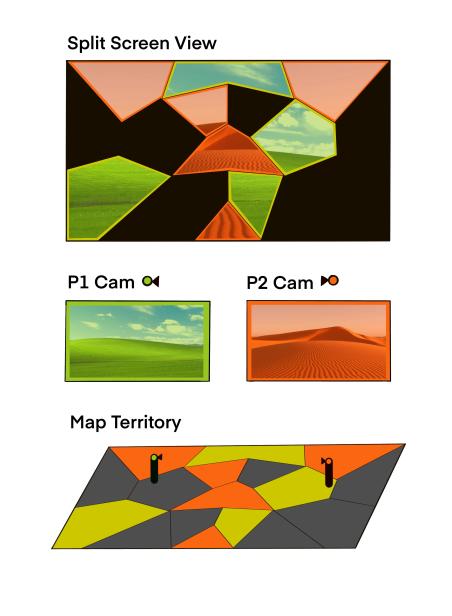
I came up with a system, that builds on the usual technicality of a split-screen, which from a more technical standpoint is mandatory for local multiplayer games. In the case of a shooter, specifically the problem in correlation with first person shooters come to mind. This would usually result in either a seemingly too low x-height of an individual segment of the screen, or alternatively a too narrow y-width.
Sometimes it could feel like the players are fighting over screen space. Which exactly what you do in Overbloom. By shooting your resources across the map, which has the usual 16:9 aspect ratio, a player can unlock parts of the screen, either unlocking new area or taking it from your opponent.


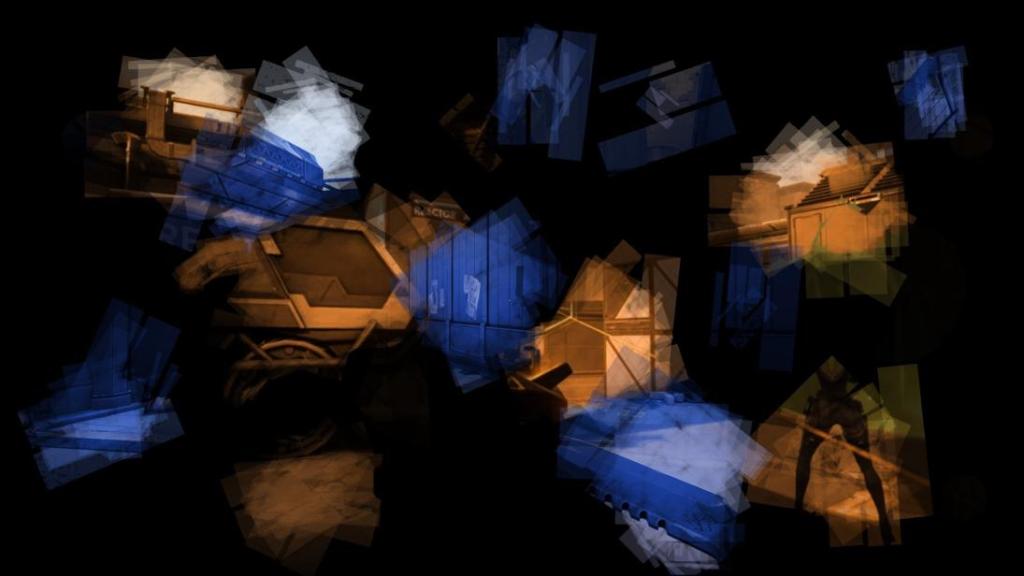

This territorial gameplay brings a sense of innovation and defies the usual expectations of what a versus based first person shooter can be
Technical Implementation
Challenge
The above mentioned idea presents new issues to surmount. At first I planned on having a camera render the placed resources from both parties, rasterize them and turn it into masks. Upon consultation with David Witzgall, a teacher of ours, we decided to simplify this concept. I did so by designing dedicated areas on the map, that are each assigned to a part of the screen.
Solution
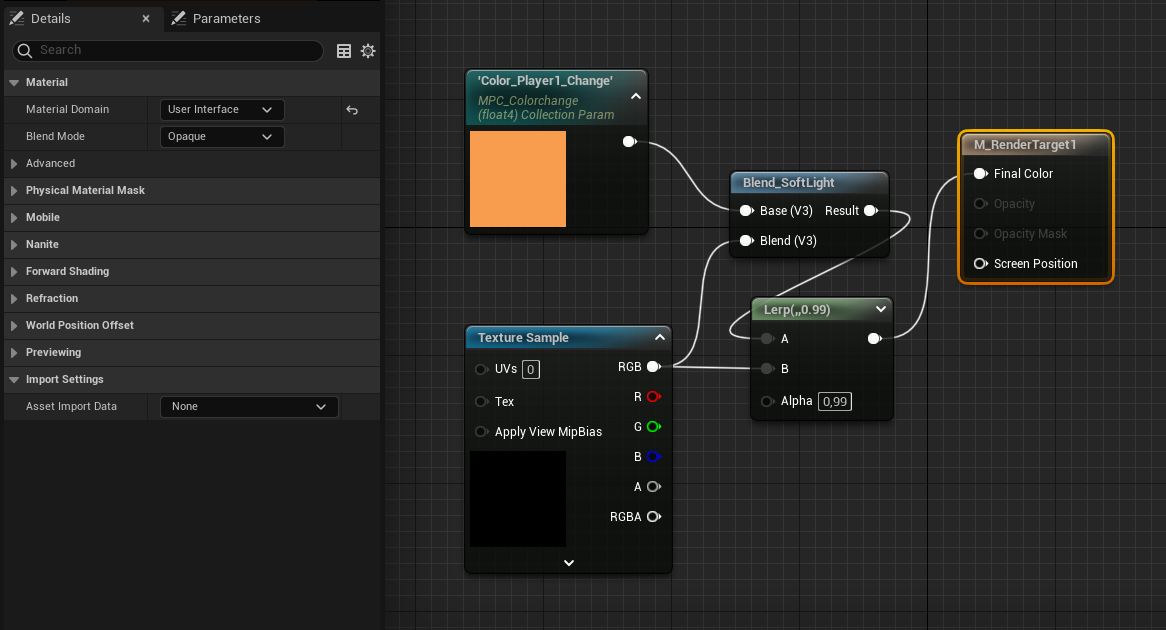
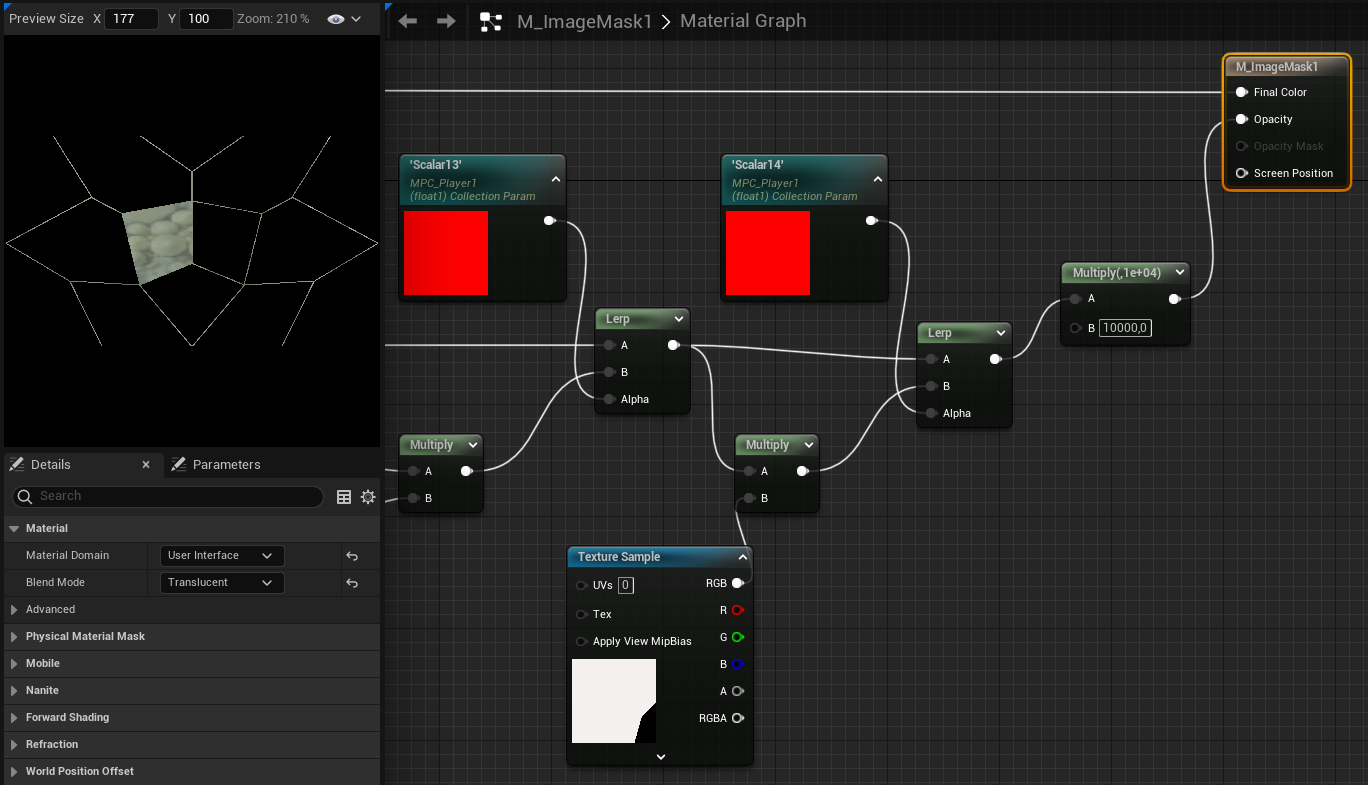
I started by creating a Render Target for each Player. It is important for the Material Domain to be set to “User Interface”
To be ignored here is the blend with the color in the shader.
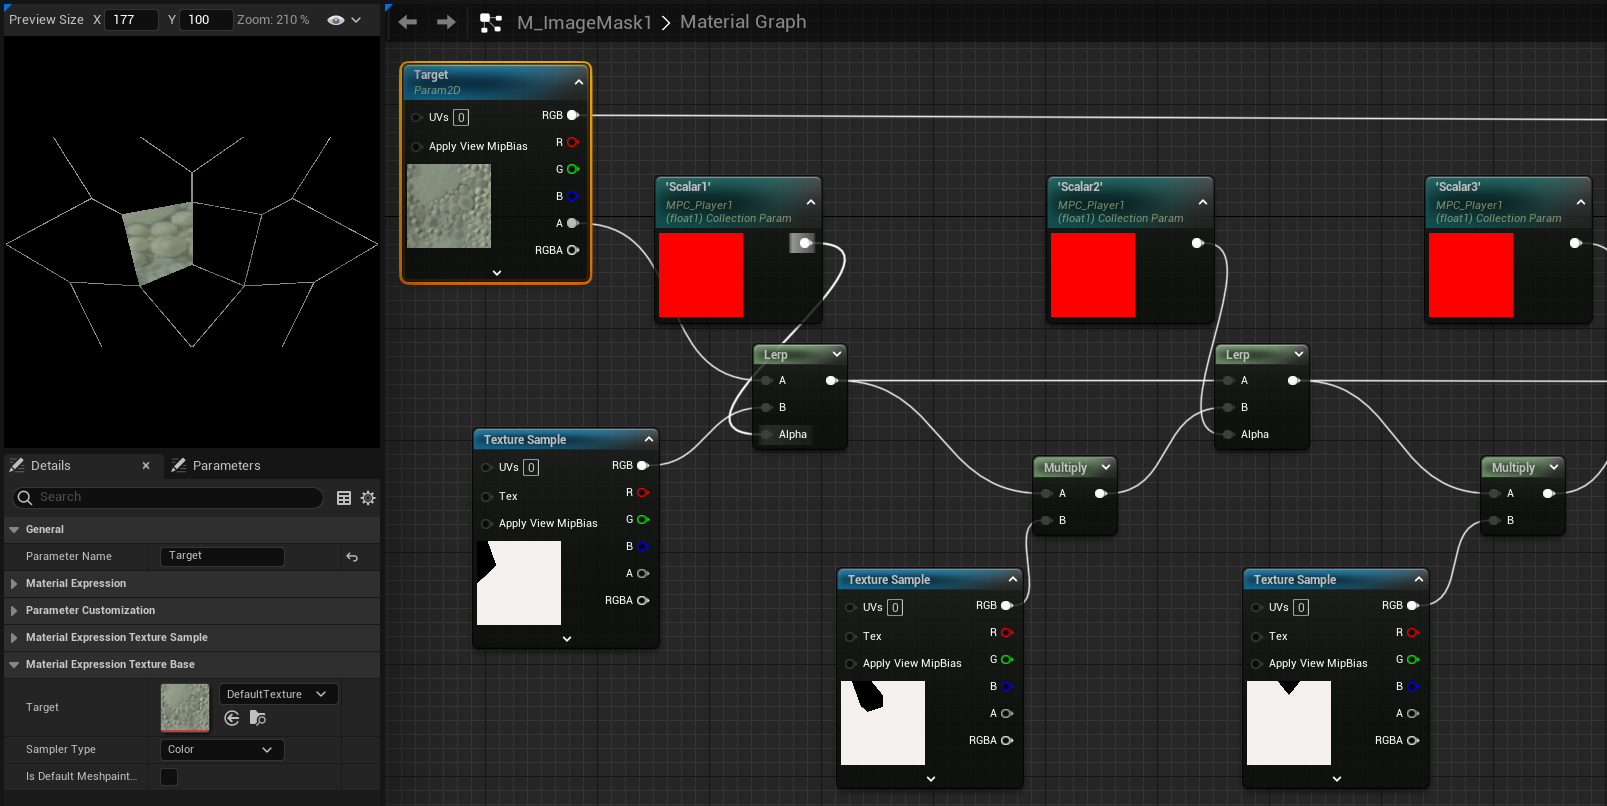
Next I created an image mask for both players. In it, I assembled several masks, each of which being lerped between being integrated (1) and ignored (0),
This number is manipulated in an MPC (multiply parameter collection). One of each every player needs. Within, every fragment of the mask needs its own parameter.
The input texture needs to be renamed to “Target”. The output material domain has to be the User Interface domain with its blend mode being translucent.
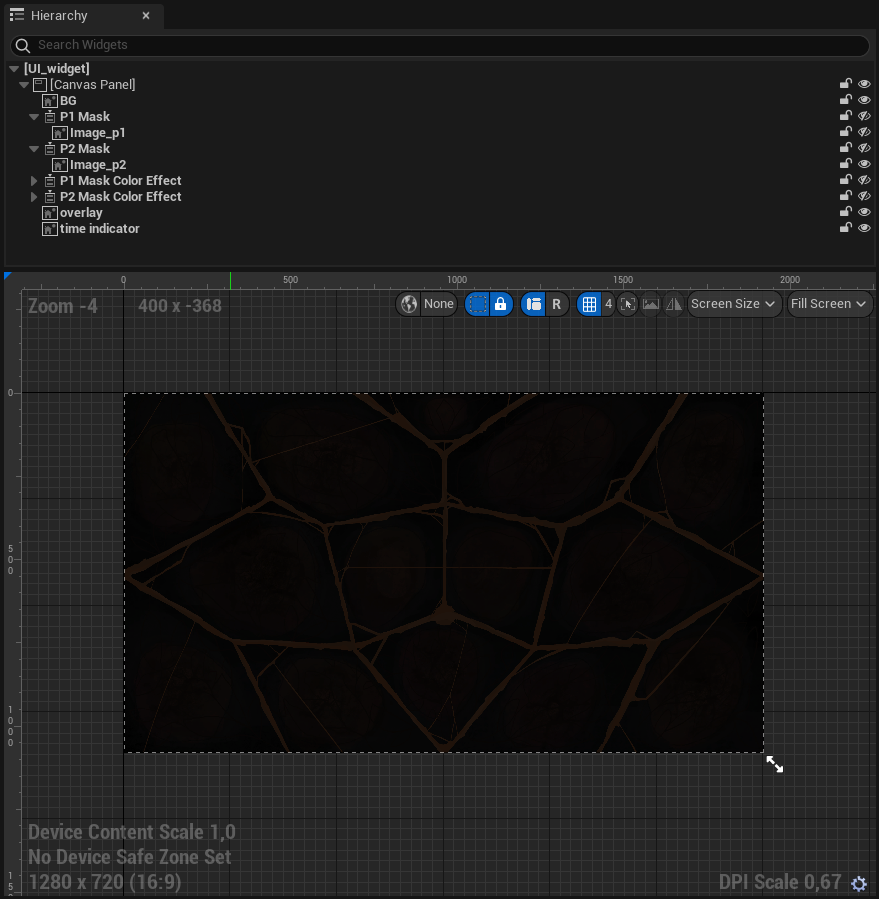
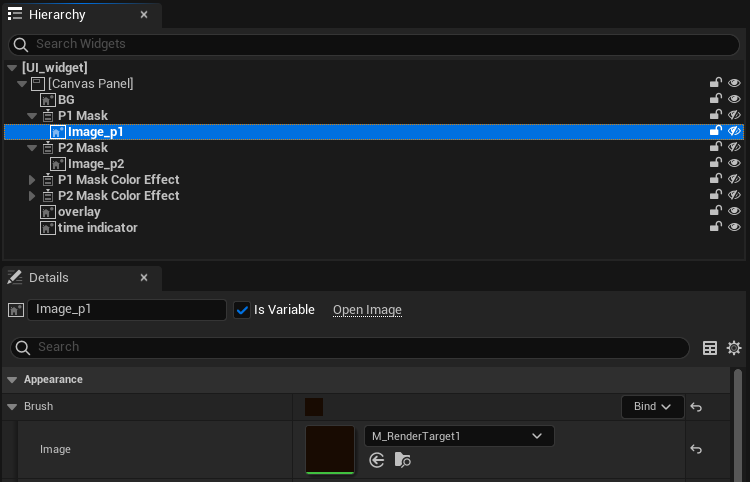
Next, I created a widget, which needs to be added to the viewport in the level blueprint event graph.
Apart from the background and overlay images, it is essential, that each player gets their own retainer, acting as a mask in addition to the image being displayed.
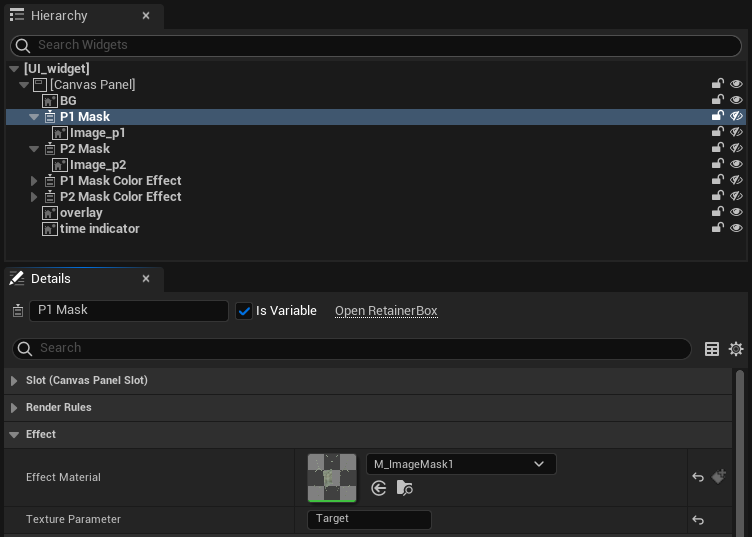
The masks effect material has to be assigned to the relevant player’s image mask material, with their texture parameter set to “Target”
The image’s brush must be assigned to the render target material we created.
In the content drawer, it is necessary for the next step to add a render target for each player, which can be found under the texture section.
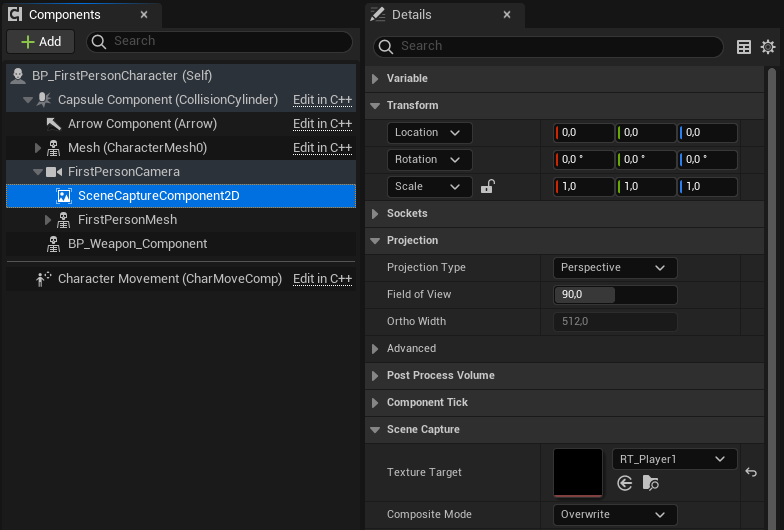
In the first person player blueprint we add a scene capture component with identical transform and projection settings. Under scene capture, one can assign the texture target to the render target. For this you will have to find a solution to address the correct render target for each player. I managed this in the construction script.
When a zone changes ownership, it has the ability to change the player’s MPC’s relevant value, which I managed via a simple index variable.
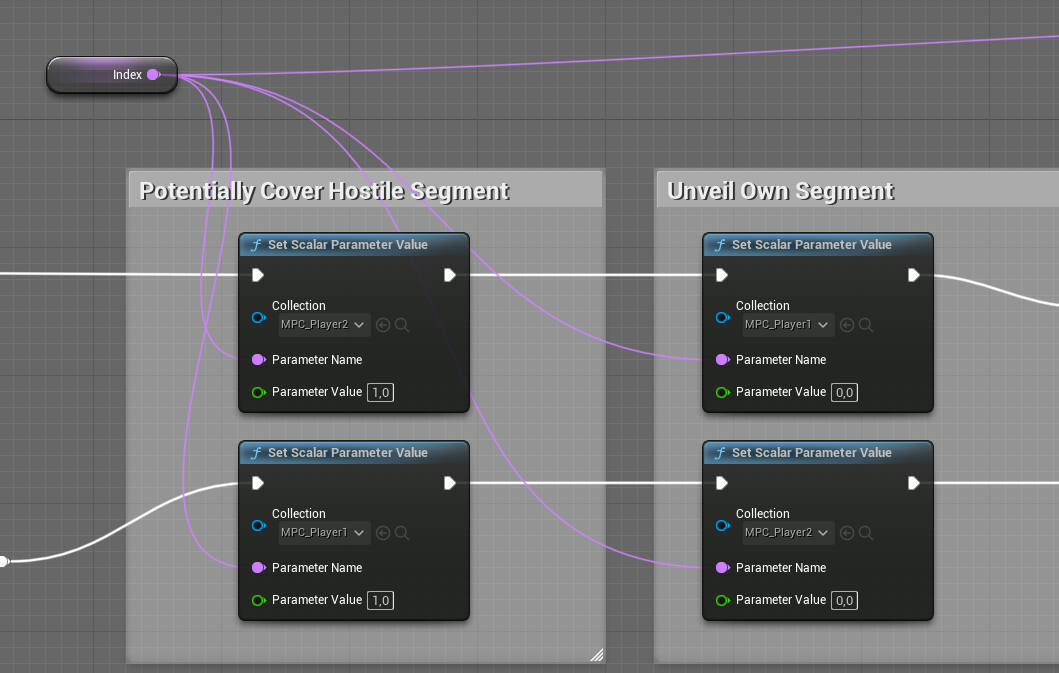
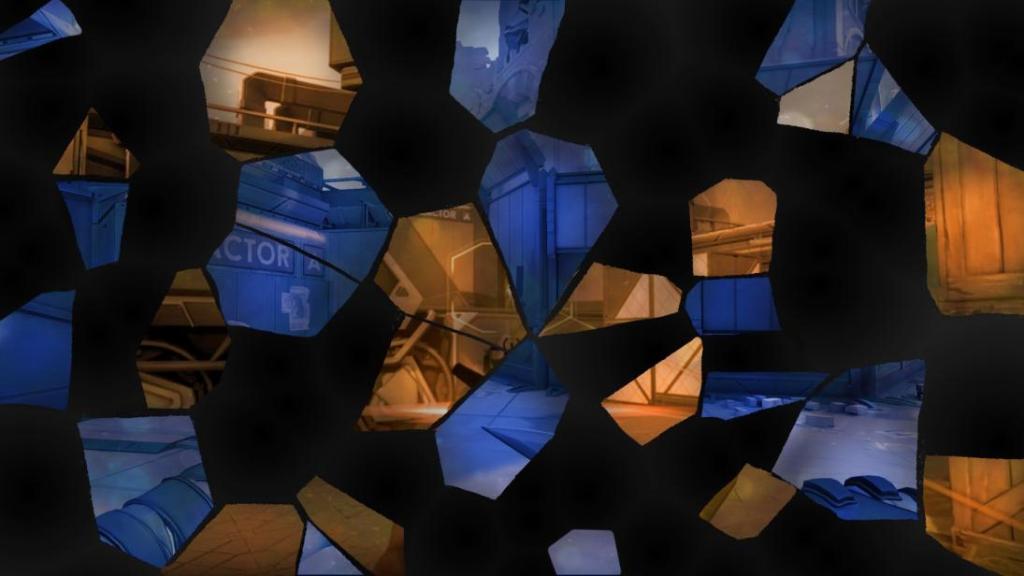
Once all these steps had been implemented, we had a scattered split screen with up to 15 zones that could then be designed to achieve desired system design and art criteria.
Hypnagogia
Oskar Lazar, Toby Pravemann, Moritz Hilger @ DE:HIVE
2024 / narrative rhapsodic text adventure
Demonstrates:
System Design
Role:
System Design, Technical Implementation
Time:
3 days
System Design
Challenge
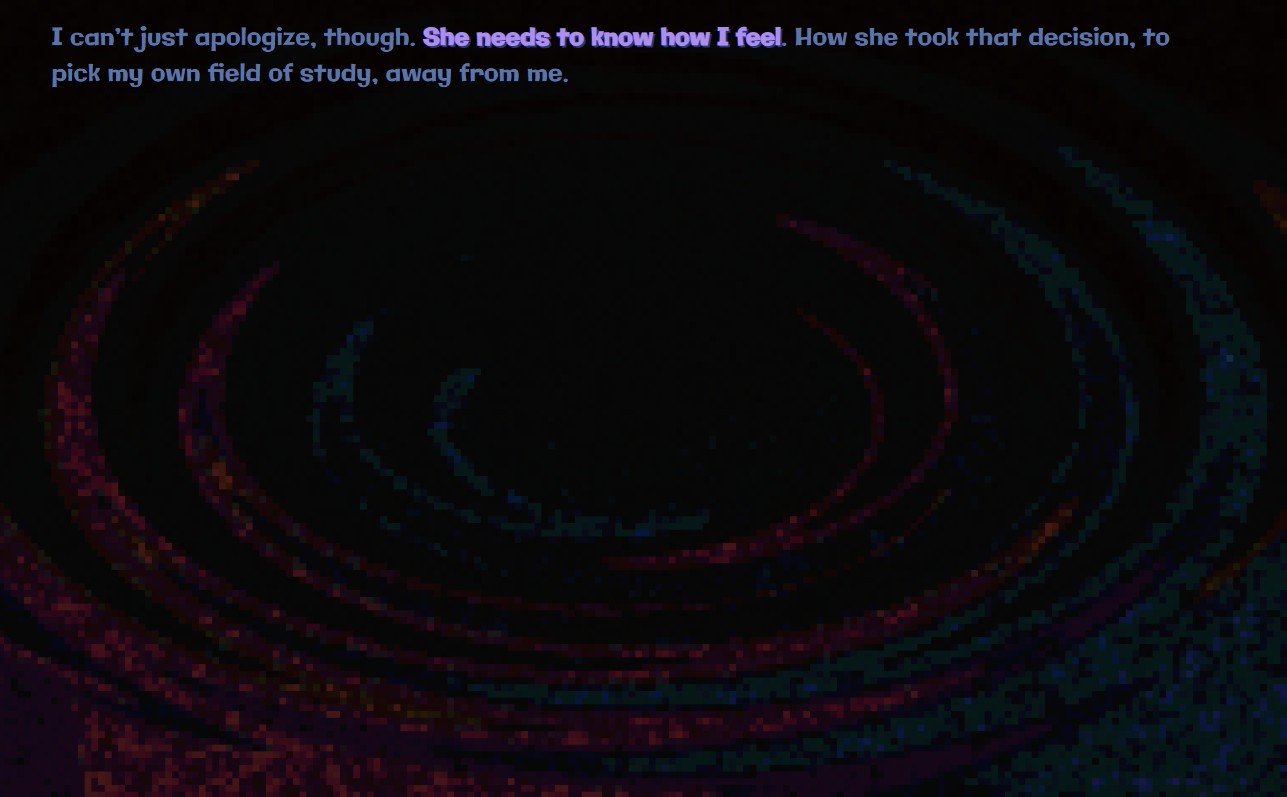
The player must experience a ruminating type experience through seamingly random thoughts, reflective of those experienced in the period of time right before falling asleep. This phase is called hypnagogia. At the same time, some thoughts should navigate the player closer to deeper, more meaningful, and uncomfortable thoughts to our protagonist. After having found 5 of those thoughts, the player would be able to go to sleep without nightmares. How are these thoughts structured? What makes up these thoughts? How do we get from random stuff to deeper meanings?
Solution
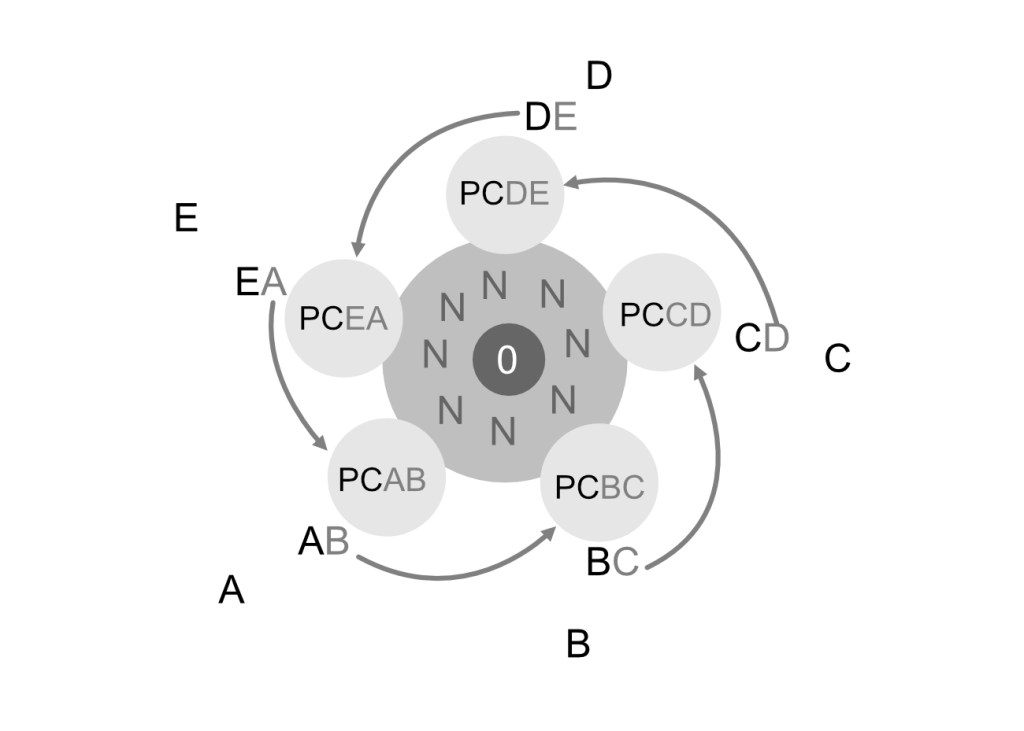
- A, B, C, D, E are the 5 required thoughts in order to win the game, internally called “nuggets”
- XY are thoughts really close to nuggets, going the “wrong” way will leave you not too far from a nugget.
- PCXY are “pre-crucial” loops of 4 thoughts that can lead closer to the nuggets or into the nonsense
- N is a massive construct of nonsensical thoughts that overlap with the precrucial loops. They have an internal structure and logic too, but that can’t be felt by the player
- 0 is the introduction thoughts when starting the game
- NM, not shown here, are the nightmares one enters when attempting to go to sleep. The same goes for ABCDE, the thoughts that arise when actually being able to go to sleep after surmounting all personal challenges / finding all nuggets.
Any of these thoughts is highlighted if they have already been discovered. This prevents the player from discovering the same nugget twice, and therefore steers them to new undiscovered nuggets.
Implementation
Tony Pravemann populated all these thoughts, giving each a topic. The natural random structure of the nonsensical thoughts was smoothly enforced through my predefined structure.
Demonstrates:
Level Design
Role:
Solo Dev
Time:
5 days

Level Design
Challenge
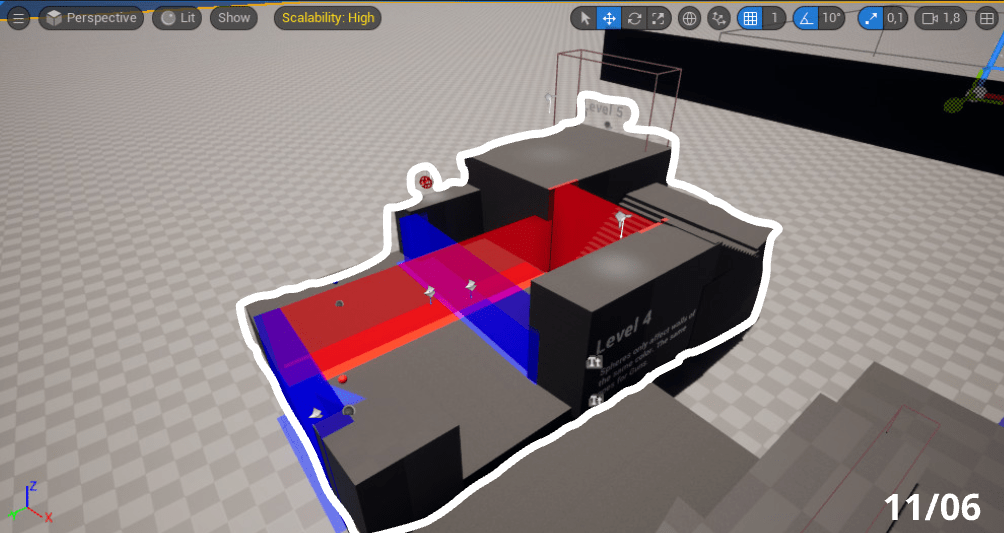
Create a learning curve to explain the games’ main and secondary mechanics through increasingly complex puzzles.
Workflow
I sketched out my puzzles beforehand, starting with one of the more difficult levels, which ended up being Level 6 / 7.
I then reverse engineered what mechanics had to be explained beforehand, in order to be able to understand that level.
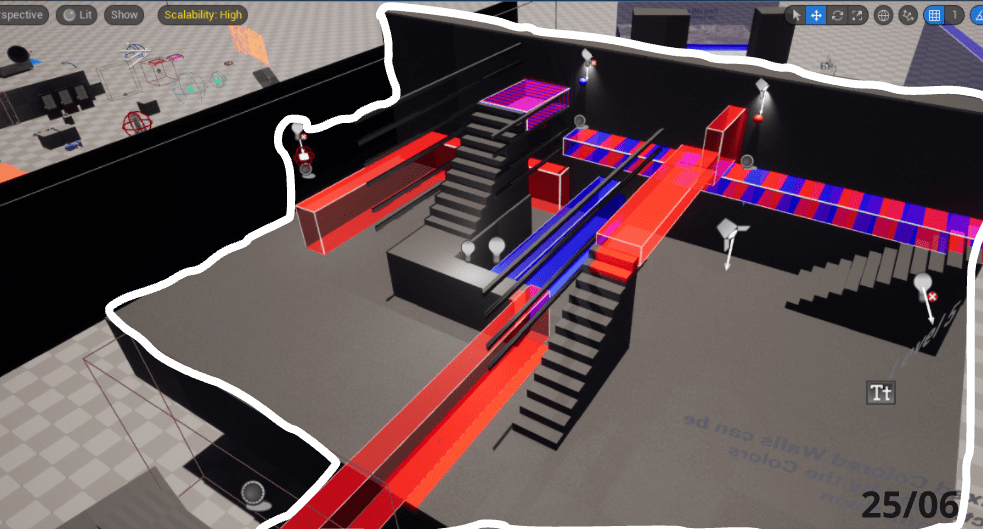
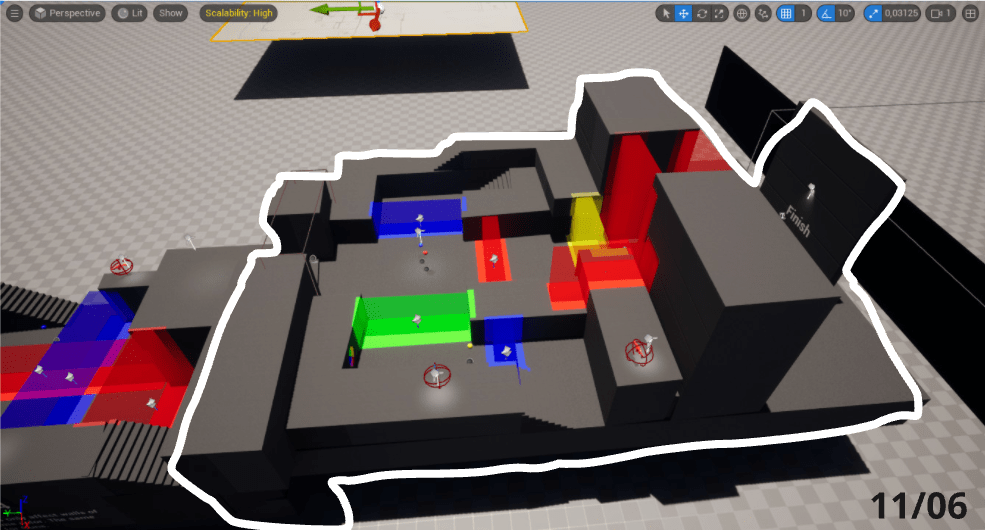
- Buttons de-/activate walls of that color
- Guns allow you to activate buttons of the same color from afar with LOS
- Guns disappear when enterin the next level
- It will often be requried to walk on top of walls
- Sometimes one should deactivate a wall while standing on it
- There are differently colored buttons and walls
- There are differently colored guns. Switching between them is possible via the mouse wheel
- There are mixed colored walls, which can be activated by the buttons of the colors that mix the wall
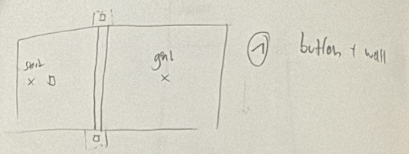
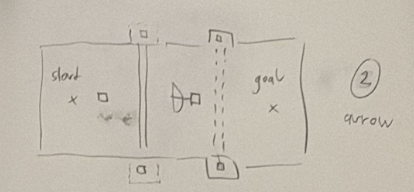
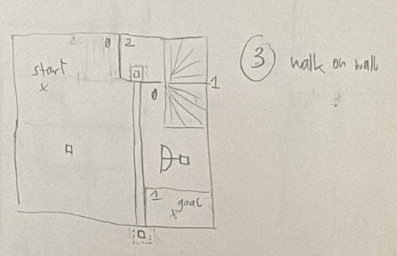
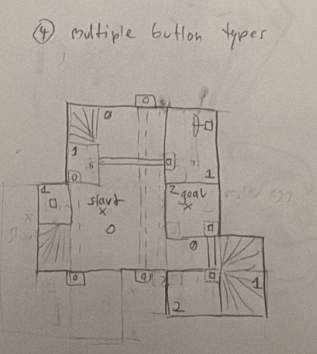


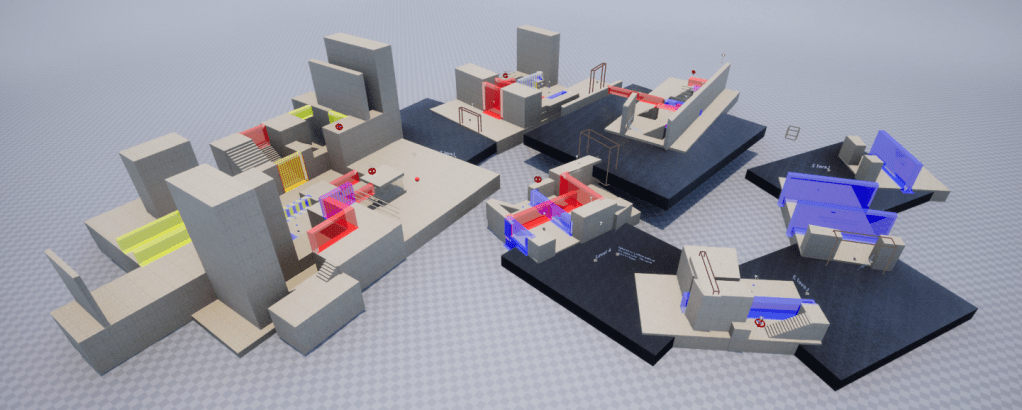
Based on those sketches, I created blockouts, most of which strongly resembled my initial vision.
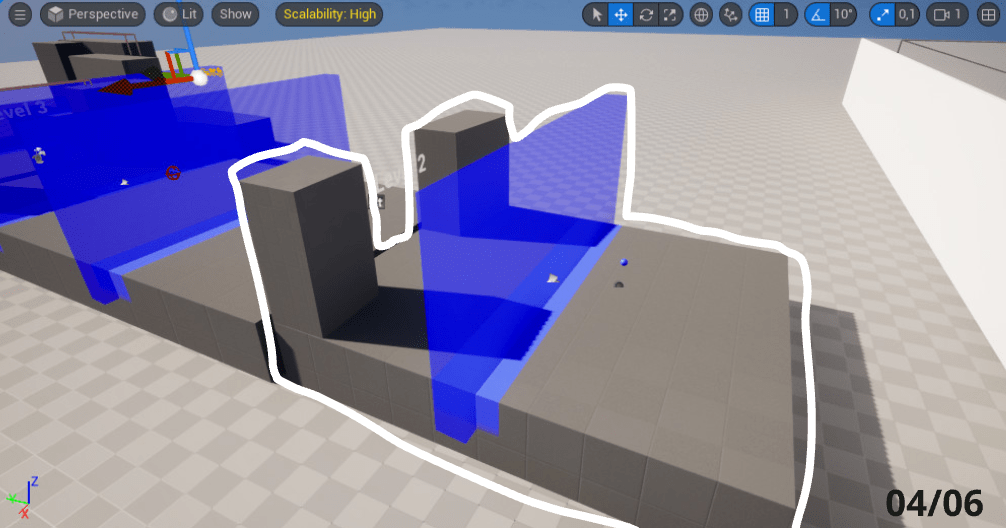
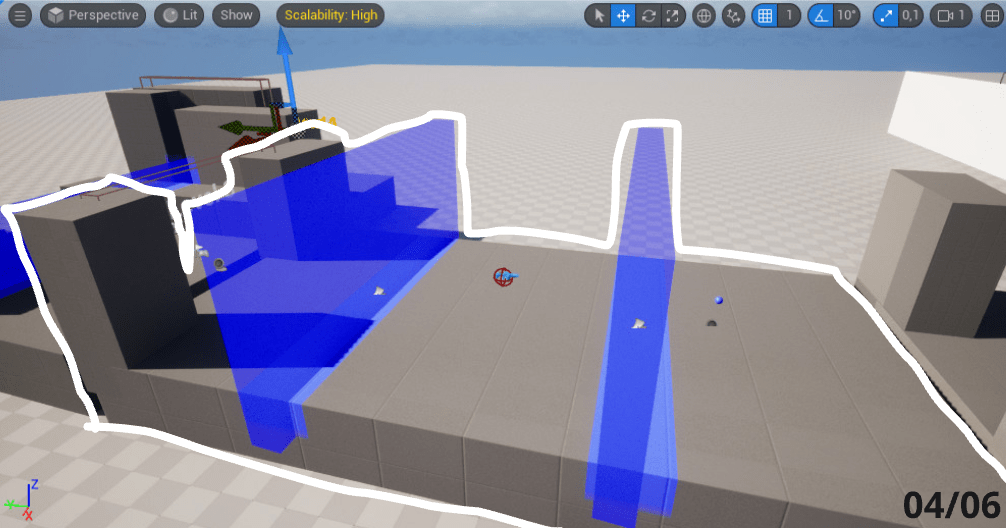
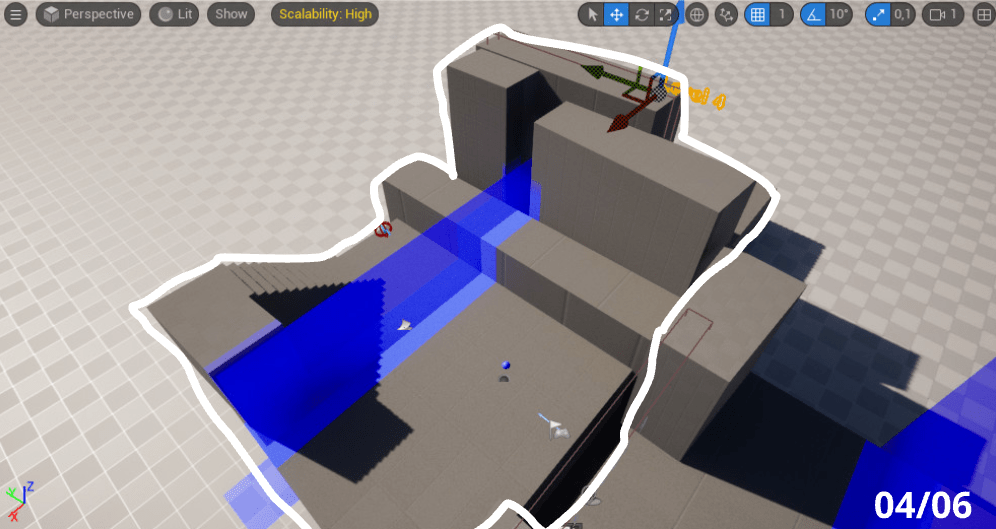
Final Result

Demonstrates:
System Design
Role:
System Designer, Producer
Time:
1 week
System Design
Challenge
In this 1 week game jam, we were tasked with creating a board game, that incorporated the concept of circular economy, be that as the central game flow or the topic of the game. In both cases it would be advantageous if the game conveyed a message regarding the topic at hand.
Workflow
Even within a single week, our team went through a vast variety of different prototypes before ending up with a playable game. Every single day we made big decisions to change fundamental things about our game. Every playtest showed that either the competitiveness, the topic or the fun was errant. Importantly however, we summoned the courage each time, to change essential parts of our game and starting with a new premise.
In the short time available each day to iterate on feedback, design a suitable system, prepare prototyping materials, write a rule set and conduct a playtest, it was important to be well organized with tools such as timeboxing.
Solution
We revealed an engaging game loop that encapsulated the heart of our creation. Players tactically positioned tokens on blueprints, deftly maneuvering through a timeline that embodied the principles of circularity. Within this system, the game came alive, offering an interactive canvas where players orchestrated connections, conducted splits, and artfully assembled resources. Each move within this intricate dance showcased the core essence of the circular economy, where every action contributed to a continuous cycle of renewal and purpose.
Short Description
Join the 4-player game of plastic recycling! Strategically arrange
tokens to optimise recycling efforts and manage the timeline wisely
along the waste sheet for a sustainable future. Easy to learn, hard to
master. Compete with friends to lead the recycling revolution and
become the ultimate eco-champion!
Material List
- 56 tokens (14 of each colour: pink, yellow, blue and orange)
- 70 connection sticks
- 4 player sheets (4 blueprints of different shapes on it)
- 4 point markers
- 1 waste sheet
- 1 timeline marker
Goal
Have the most points at the end of the game, by recycling plastic in a smart way
Set up and Start
Put the waste sheet in the middle of the table. Locate the timeline marker on the field that says ‘start’.

Each player gets one point marker and sets it to 0 on their sheet. The start setup is slightly different for
each player. Arrange the tokens and connection sticks according to the picture.
Game Loop
One round consists of each player taking a turn after each other in clockwise order. A random player
starts.
On your turn, there are 3 phases:
1) Taking
During the first round, this will not matter, as there is nothing to take. If there is nothing to take,
continue to ‘ 2) Connecting and Splitting’, but remember it for later rounds.
- You may take a pile of tokens from the waste sheet, if the number of tokens matches a
- completely free splitting blueprint of the same amount on your player sheet.
- You arrange the tokens on the slots of the blueprint in any way.
- You then put the appropriate amount of connection sticks between the tokens, as shown on the
blueprint.
2) Connecting and Splitting
In this phase, you can do up to 2 Connections or Splits.
Connecting:
Tokens that you arrange on a blueprint by ‘1) Taking’ them, automatically get connected. However, you can add connections or enforce them.
- Choose two adjacent tokens on any blueprint of any player and add a connection, even when it
- already has a connection.
- You cannot add a connection between two tokens if they are already enforced by two
connections. - When you split an enforced connection, you remove the enforcing connection stick and the
affected tokens are now only connected by a single connection stick.
Splitting:
- You name two colours and take away all connection sticks between tokens of these two colours.
- If a token has no connection sticks attached to it, you immediately add the token to your storage.
- You can not break a combination of two colours if that would cause your storage to overflow.
3) Assembling
Take a number of tokens of the same colour in your storage (between 2 and 5). Depending on the
amount of tokens assembled, you gain certain points:
- 1 point for two tokens of the same colour
- 2 points for three tokens of the same colour
- 4 points for four tokens of the same colour
- 7 points for five tokens of the same colour
Move your point marker along the point scale according to your amount of points.
Adding assembled tokens to the waste sheet.
Take the assembled tokens from your player sheet and distribute all assembled tokens along the waste sheet 1 by 1, pile by pile, starting with the space that is indicated by the timeline marker. For each token distributed, the timeline marker is moved by one. You can choose in which order you add the tokens. Over time this process accumulates piles of tokens, that you can get in the ‘1) Taking’ phase. If you attempt to add a token to a pile of 5 tokens, the pile is skipped and the timeline marker adjusts accordingly.
This is the end of a turn. The next person in clockwise order starts their turn.
End of Game
Once a player surpasses 20 points, the round is played to its end as all of you play your final turn. The
player with the most points at the end wins.
Stonesight
Luca Schmidt, Fabian Wislsperger, Oskar Lazar, Friederike Rost, Leonie Srasser @ DE:HIVE
2023 / meditative eye tracking game – downloadable on itch.io
Demonstrates:
–
Role:
2D Artist, Sound Designer
Time:
3 weeks


Demonstrates:
Procedural Map Generatioon
Role:
System Designer, Programmer
Time:
1 day
Procedural Map Generation
Challenge
With a little time (1 day) and ressources (2 people) available, we needed at least some level of replayability to this auto runner.
Solution
With collectibles, power ups, or pre-made levels of the table, I resorted to
- making a procedurally generated map.
- an automatically increasing score and running speed
Dong Woo designed short to large map elements for me. Shorter ones for a slower game speed, and elongated ones for fast game speed. I added meshes to those designs and developed a code to chain those map elements together, dependent on current game speed.
Moko – System Design
Shellycoat – Character Controller Design
Obscrete – Level Design
Overbloom – Innovation, Technical Implementation
Hypnagogia – System Design
Untitled Project – Level Design
Plastic – System Design
Stonesight
AutoRunner – Procedural Map Generation
